让我们通过制作 RPG 来学习 Godot 4 — 第 3 部分:玩家动画
我们的玩家已经设置好了,当我们运行游戏时,它会在地图上移动。但是有一个问题,那就是它只是静态移动。它没有配置动画!在本节中,我们将重点介绍如何为玩家添加动画,以便它可以四处走动并开始活跃起来。
您将在本部分中学习到的内容:
· 如何使用精灵表进行动画制作。
· 如何使用 AnimatedSprite2D 节点添加动画。
· 如何将动画与输入动作连接起来。
· 如何添加自定义输入操作。
· 如何使用 input() 函数和 Input 单例。
· 如何使用内置信号。
对于我们的玩家,我们需要动画来上下左右移动。对于每个方向,我们将设置空闲、行走、攻击、伤害和死亡的动画。由于我们要处理的动画太多,我将带您了解第一个方向,然后给您一个表格来完成其余部分。
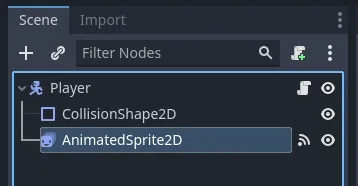
在 Player 场景中,选中 AnimatedSprite2D,我们可以看到已经添加了向下行走的动画。让我们将这个默认动画重命名为walk_down。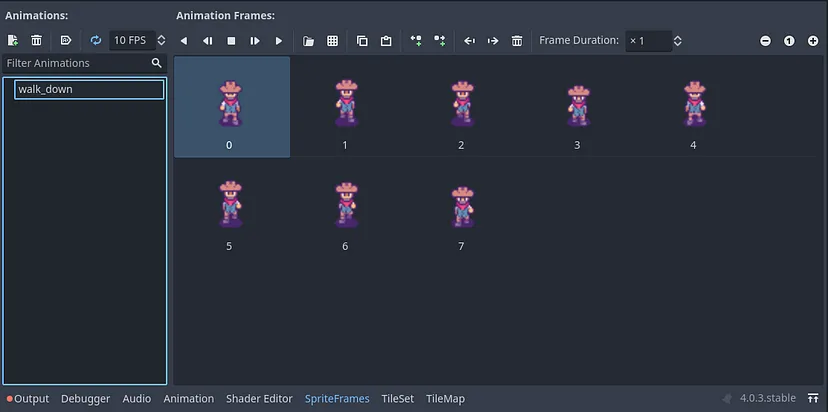
单击文件图标添加新动画并将其命名为idle_down。与之前一样,让我们选择“从 Sprite Sheet 添加帧”选项,然后导航到播放器的正面动画。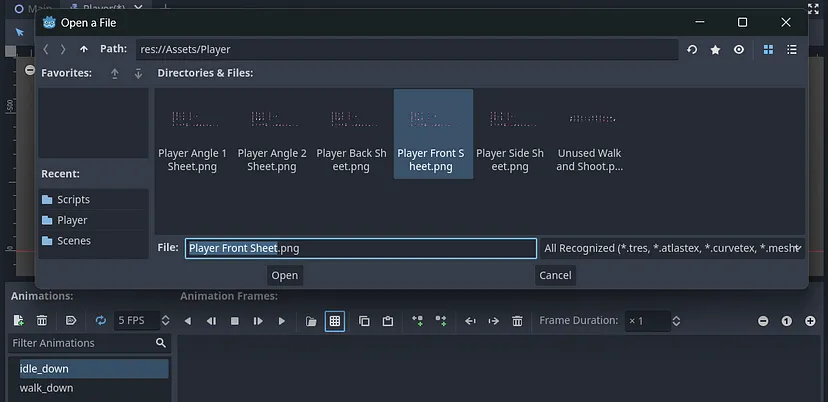
将水平值更改为 14,将垂直值更改为 5,然后选择我们的空闲动画的第一行帧。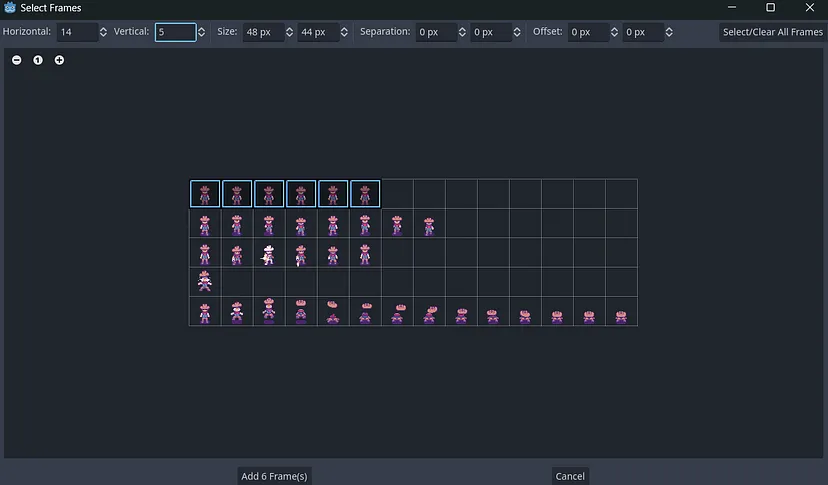
将其 FPS 值更改为 6。
添加新动画,并将其命名为attack_down。对于这个,您需要选择第三行动画帧。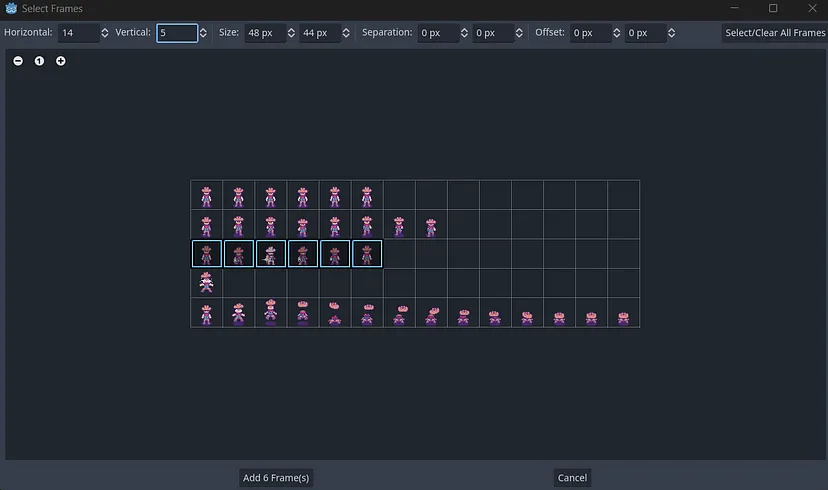
将其 FPS 值更改为 6 并关闭循环,因为我们只希望此动画触发一次而不是连续触发。
接下来,让我们添加一个新动画,并将其命名为damage。为此动画选择第 4 行中的单帧。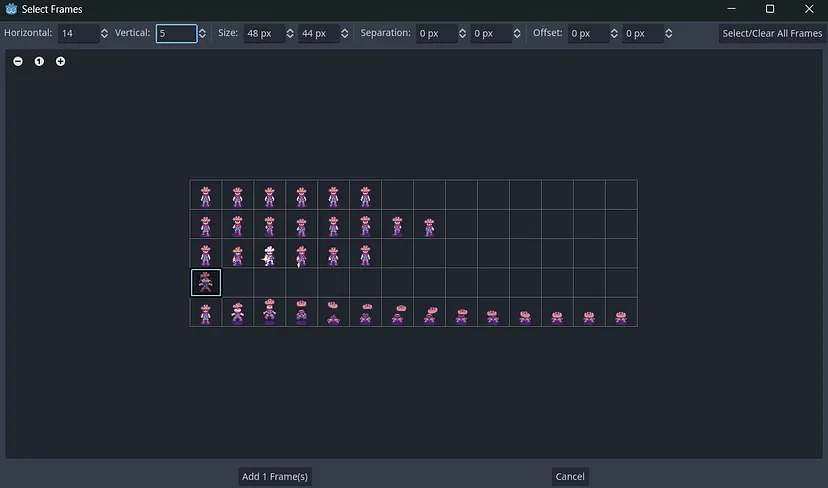
将其 FPS 值更改为 1 并关闭循环。
最后,创建一个新的动画并将其命名为“死亡”。将最后一行帧添加到此动画中。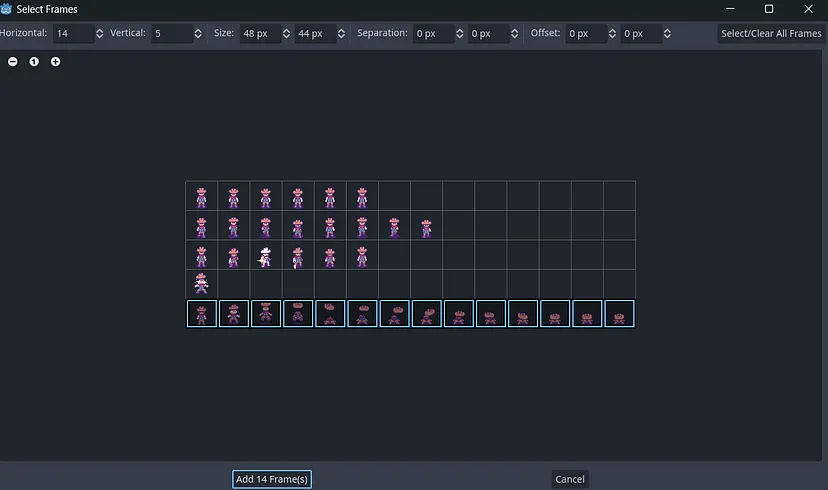
将其 FPS 值更改为 14 并关闭循环。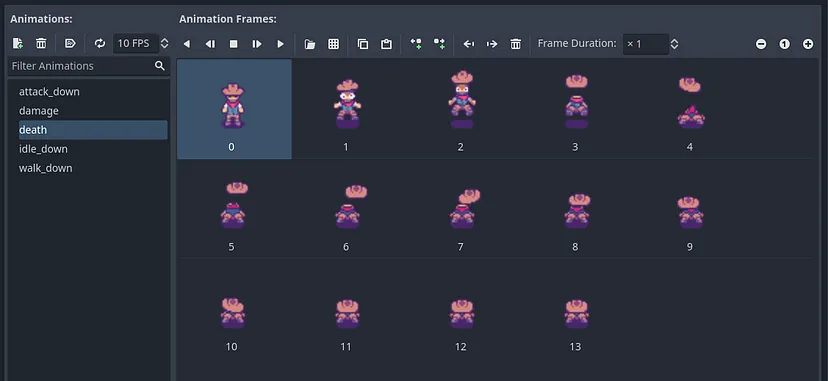
现在我们已经创建了向下动画以及死亡和伤害动画。您认为自己可以自己添加其余部分吗?如果不行,请联系我,我会修改本节并提供有关这些内容的说明。
对于更大胆的人,这里有一个你需要添加的动画表: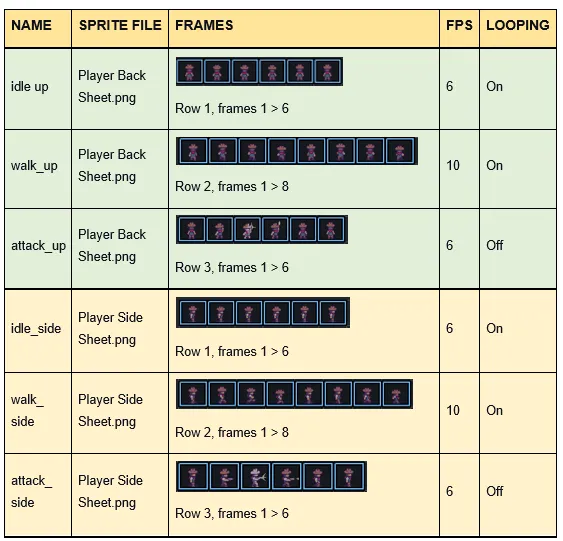
最后,你的完整动画列表应如下所示: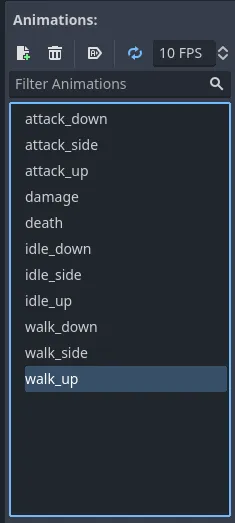
现在我们已经添加了所有玩家的动画,我们需要更新脚本,以便将这些动画链接到我们的输入操作。我们希望在按 W 或 UP 时播放“向上”动画,在按 S 或 DOWN 时播放“向下”动画,在按 A 和 LEFT 或 D 和 RIGHT 时播放“向左”和“向右”动画。
让我们通过单击 Player 节点旁边的滚动图标来打开脚本。由于我们已经在_physics_process()函数中添加了移动功能,因此我们可以继续创建一个自定义函数,该函数将根据玩家的方向播放动画。此函数需要将 Vector2 作为参数,它是表示玩家在特定空间和时间中的位置或方向的浮点坐标(请参阅前面部分中的矢量图像作为对此的复习)。
在现有代码下,让我们创建player _ animations()函数。
  ### Player.gd
extends CharacterBody2D
# Player movement speed
@export var speed = 50
func _physics_process(delta):
# older code
# Animations
func player_animations(direction : Vector2):
pass
为了确定玩家所面对的方向,我们需要创建两个新变量。第一个变量是我们将与零向量进行比较的变量。如果方向不等于 Vector(0,0),则表示玩家正在移动,这意味着玩家的方向。第二个变量将存储此方向的值,以便我们可以播放其动画。
让我们在脚本之上、速度变量之下创建这些新变量。
### Player.gd

extends CharacterBody2D

# Player movement speed
@export var speed = 50

func _physics_process(delta):
    # older code

# Animations
func player_animations(direction : Vector2):
    pass
为了使我们的代码更有条理,我们将使用@onready注释来创建对 AnimatedSprite2D 节点的引用实例。这样,我们可以重复使用变量名,而不必每次想要更改动画时都说 $AnimatedSprite2D.play()。请注意,在播放 side_ 动画时,我们还会水平翻转精灵。这样,我们就可以对左右方向重复使用相同的动画。
### Player.gd
extends CharacterBody2D
# Node references
@onready var animation_sprite = $AnimatedSprite2D
现在,在我们新创建的函数中,我们需要将 new_direction 变量与零进行比较,然后将动画赋给它。如果方向不等于零,则我们正在移动,因此应该播放行走动画。如果它等于零,则我们静止不动,因此应该播放空闲动画。
### Player.gd

extends CharacterBody2D

# Node references
@onready var animation_sprite = $AnimatedSprite2D

# older code

# Animations
func player_animations(direction : Vector2):
    #Vector2.ZERO is the shorthand for writing Vector2(0, 0).
    if direction != Vector2.ZERO:
        #update our direction with the new_direction
        new_direction = direction
        #play walk animation because we are moving
        animation = #todo
        animation_sprite.play(animation)
    else:
        #play idle animation because we are still
        animation  = #todo
        animation_sprite.play(animation)
但是我们如何确定动画呢?我们可以进行长条件检查,或者创建一个新函数,在玩家按下输入操作后,根据平面方向 (x, y) 确定方向(左、右、上、下)。如果玩家按下向上,那么我们应该返回“向上”,对于向下、侧面和左侧也是如此。如果玩家同时按下向上和向下,我们将返回侧面。
还记得我们必须在每个动画后放置 _up、_down 和 _side 吗?好吧,这也是有原因的。让我们在player_animations()函数下面创建一个新函数来了解我的意思。
### Player.gd

# older code

# Animation Direction
func returned_direction(direction : Vector2):
    #it normalizes the direction vector
    var normalized_direction  = direction.normalized()
    var default_return = "side"

    if normalized_direction.y > 0:
        return "down"
    elif normalized_direction.y < 0:
        return "up"
    elif normalized_direction.x > 0:
        #(right)
        $AnimatedSprite2D.flip_h = false
        return "side"
    elif normalized_direction.x < 0:
        #flip the animation for reusability (left)
        $AnimatedSprite2D.flip_h = true
        return "side"

    #default value is empty
    return default_return
在这个函数中,我们检查玩家的 x 和 y 坐标的值,并在此基础上返回动画后缀,即单词 (_up、_down、_side) 的结尾。然后,我们将这个后缀附加到要播放的动画,即行走或空闲。让我们回到我们的player_animations()函数并用此功能替换#todo代码。
### Player.gd

# older code

# Animations
func player_animations(direction : Vector2):
    #Vector2.ZERO is the shorthand for writing Vector2(0, 0).
    if direction != Vector2.ZERO:
        #update our direction with the new_direction
        new_direction = direction
        #play walk animation, because we are moving
        animation = "walk_" + returned_direction(new_direction)
        animation_sprite.play(animation)
    else:
        #play idle animation, because we are still
        animation  = "idle_" + returned_direction(new_direction)
        animation_sprite.play(animation)
现在我们要做的就是在添加运动的函数中实际调用这个函数,该函数位于_physics_process()函数的末尾。
### Player.gd

# older code

func _physics_process(delta):
    # Get player input (left, right, up/down)
    var direction: Vector2
    direction.x = Input.get_action_strength("ui_right") - Input.get_action_strength("ui_left")
    direction.y = Input.get_action_strength("ui_down") - Input.get_action_strength("ui_up")
    # If input is digital, normalize it for diagonal movement
    if abs(direction.x) == 1 and abs(direction.y) == 1:
        direction = direction.normalized()
    # Apply movement
    var movement = speed * direction * delta
    # moves our player around, whilst enforcing collisions so that they come to a stop when colliding with another object.
    move_and_collide(movement)
    #plays animations
    player_animations(direction)
如果你现在运行你的场景,你会看到,如果玩家静止,则播放空闲动画;如果玩家移动,则播放行走动画,并且玩家还会改变方向!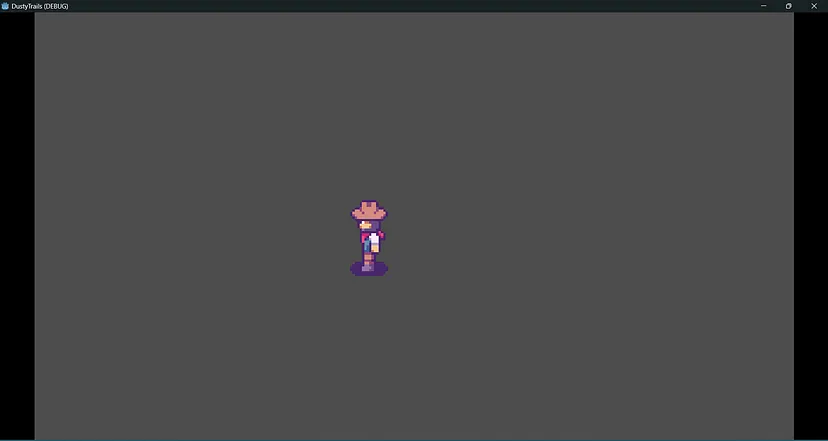
在此过程中,我们还要为玩家的进攻和冲刺添加动画功能。对于这些动画,我们需要新的输入操作,因此在项目设置的“输入映射”下,让我们添加一个新输入。
将第一个命名为ui_sprint,将第二个命名为ui_attack。
将 Shift 键分配给 ui_sprint,将 CTRL 键分配给 ui_attack。如果需要,您还可以为此分配操纵杆键。我们将在_physics_process()函数中添加冲刺输入,因为我们稍后会使用它以恒定速率跟踪我们的耐力值,但我们将在_input(event)函数中添加攻击输入,因为我们希望捕获输入,但不要在游戏循环期间跟踪。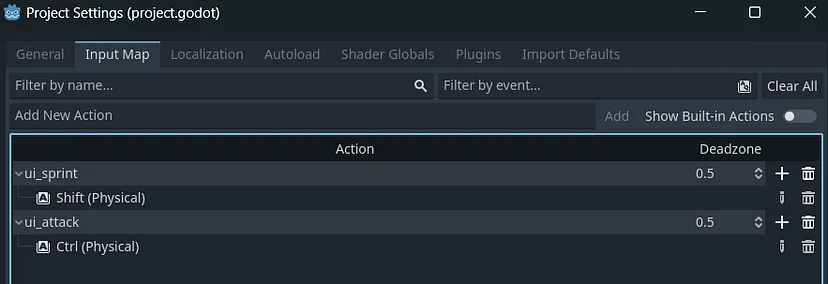
您可以在 Godot 的内置_input函数中添加输入,也可以通过Input Singleton 类添加。如果您希望在整个游戏循环中存储输入操作的状态,则可以使用 Input 单例,因为它独立于任何节点或场景,例如,您可以在希望能够同时按下两个按钮的场景中使用它。
_input 函数可以捕获输入is_action_pressed() ' 和is_action_released() ' 函数,而 Input 单例通过`is_action_just_pressed()' / 'is_action_just_released() ' 函数捕获输入。我制作了一些图像来简单解释不同类型的输入函数。
何时使用 Input Singleton 与 input() 函数?
. 在 Godot 中,你可以通过两种方式触发输入事件: input() 函数和Input Singleton。两者之间的主要区别在于,在 input() 函数中捕获的输入只能触发一次,而 Input Singleton 可以在任何其他方法中调用。
. 例如,我们在 physics_process() 函数中使用 Input 单例,因为我们希望连续捕获输入以触发事件,而如果我们要暂停游戏或射击,我们会在 input() 函数中捕获这些输入,因为我们只希望捕获一次输入 - 即当我们按下按钮时。

图 6:输入法。在线版本请见此处。
让我们从攻击输入的代码开始。我们只想在玩家不攻击时播放其他动画,反之亦然。为此,我们需要创建一个新变量,我们将使用它来检查玩家当前是否正在攻击。
### Player.gd
extends CharacterBody2D
# Node references
@onready var animation_sprite = $AnimatedSprite2D
# Player states
@export var speed = 50
var is_attacking = false
现在我们可以修改我们的_physics_process()函数,使其仅播放返回的动画,并且仅在玩家未攻击时处理我们的运动。
### Player.gd

extends CharacterBody2D

# older code

func _physics_process(delta):
    # Get player input (left, right, up/down)
    var direction: Vector2
    direction.x = Input.get_action_strength("ui_right") - Input.get_action_strength("ui_left")
    direction.y = Input.get_action_strength("ui_down") - Input.get_action_strength("ui_up")
    # If input is digital, normalize it for diagonal movement
    if abs(direction.x) == 1 and abs(direction.y) == 1:
        direction = direction.normalized()
    # Apply movement if the player is not attacking
    var movement = speed * direction * delta

    if is_attacking == false:
        move_and_collide(movement)
        player_animations(direction)
现在我们需要调用内置的func input(event)函数,以便我们可以播放 attack 前缀的动画。让我们将此函数添加到_physics_process()函数下方。
### Player.gd
extends CharacterBody2D
# older code
func _input(event):
    #input event for our attacking, i.e. our shooting
    if event.is_action_pressed("ui_attack"):
        #attacking/shooting anim
        is_attacking = true
        var animation  = "attack_" + returned_direction(new_direction)
        animation_sprite.play(animation)
现在您会注意到,如果您运行场景并按下 CTRL 来触发攻击动画,动画会播放,但我们的角色不会返回到之前的空闲或行走动画。这是因为我们的角色卡在了攻击函数的最后一帧动画上,为了解决这个问题,我们需要使用信号通知游戏动画已播放完毕,以便它可以将is_attacking变量重新设置为 false。
为此,我们需要单击 AnimatedSprite2D 节点,然后在“节点”面板中将animation_finished信号连接到我们的播放器脚本。当我们的动画到达其帧的末尾时,此信号将触发,因此如果我们的 attack_ 动画已播放完毕,此信号将触发函数将 is_attacking 变量重置回 false。双击信号并选择脚本来执行此操作。
什么是信号?
信号是一种发射器,它为节点提供了一种无需直接引用彼此即可进行通信的方式。这使我们的代码更加灵活且易于维护。信号在某些事件发生后发出,例如,如果我们的敌人数量在敌人被杀死后发生变化,我们可以使用信号通知 UI 它需要将敌人数量的值从 10 更改为 9。
现在您将看到在玩家脚本的末尾创建了一个新方法。我们现在可以简单地将is_attacking变量重置回 false。
### Player.gd
extends CharacterBody2D
# older code
# Reset Animation states
func _on_animated_sprite_2d_animation_finished():
    is_attacking = false
接下来,我们可以继续添加玩家按住 Shift 键时的冲刺功能。由于冲刺只是移动,我们可以在_physics_process()函数中添加它的代码,该函数处理玩家的移动和物理(而不是动画)。
### Player.gd

extends CharacterBody2D

# --------------------------------- Movement & Animations -----------------------
func _physics_process(delta):
    # Get player input (left, right, up/down)
    var direction: Vector2
    direction.x = Input.get_action_strength("ui_right") - Input.get_action_strength("ui_left")
    direction.y = Input.get_action_strength("ui_down") - Input.get_action_strength("ui_up")
    # Normalize movement
    if abs(direction.x) == 1 and abs(direction.y) == 1:
        direction = direction.normalized()
    # Sprinting
    if Input.is_action_pressed("ui_sprint"):
        speed = 100
    elif Input.is_action_just_released("ui_sprint"):
        speed = 50
    # Apply movement if the player is not attacking
    var movement = speed * direction * delta
    if is_attacking == false:
        move_and_collide(movement)
        player_animations(direction)
    # If no input is pressed, idle
    if !Input.is_anything_pressed():
        if is_attacking == false:
            animation  = "idle_" + returned_direction(new_direction)
最后,如果玩家没有按下任何输入,则应播放空闲动画。这将防止我们的玩家即使输入被释放也停留在奔跑状态。
### Player.gd
extends CharacterBody2D
# Movement & Animations
func _physics_process(delta):
    # Get player input (left, right, up/down)
    var direction: Vector2
    direction.x = Input.get_action_strength("ui_right") - Input.get_action_strength("ui_left")
    direction.y = Input.get_action_strength("ui_down") - Input.get_action_strength("ui_up")
    # Normalize movement
    if abs(direction.x) == 1 and abs(direction.y) == 1:
        direction = direction.normalized()
    # Sprinting
    if Input.is_action_pressed("ui_sprint"):
        speed = 100
    elif Input.is_action_just_released("ui_sprint"):
        speed = 50
    # Apply movement if the player is not attacking
    var movement = speed * direction * delta
    if is_attacking == false:
        move_and_collide(movement)
        player_animations(direction)
    # If no input is pressed, idle
    if !Input.is_anything_pressed():
        if is_attacking == false:
            animation  = "idle_" + returned_direction(new_direction)
如果我们运行场景,我们可以看到玩家正在通过动画在地图上移动,并且他们还可以冲刺和攻击!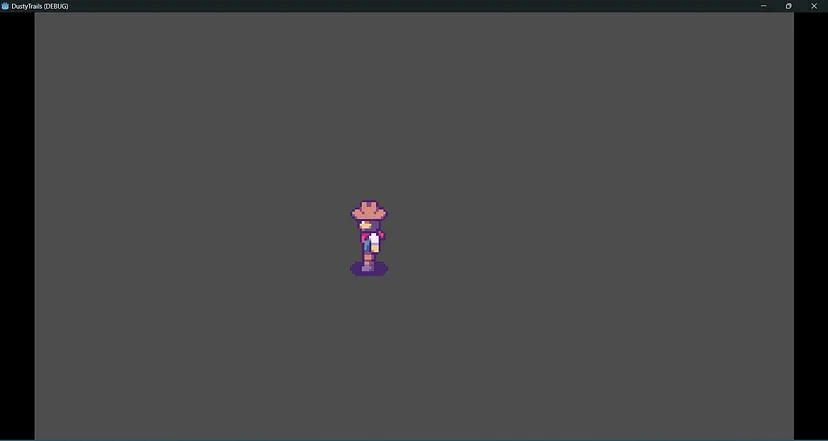
设置好玩家角色后,我们就可以开始制作动画了。在下一部分中,我们将创建游戏地图,即世界,并设置玩家的相机。记得保存你的游戏项目,下一部分见。

