让我们通过制作 RPG 来学习 Godot 4 — 第 14 部分:敌人射击和造成伤害
如果玩家是游戏中唯一能够造成伤害的实体,那就不公平了。这会让他们成为毫无威胁的强大恶霸。这就是为什么在这一部分我们要赋予敌人反击的能力,他们将能够对我们的玩家造成真正的伤害!这个过程与我们赋予玩家射击和造成伤害的能力时所做的类似。这次只是反过来。
这部分可能需要一段时间,所以请放松,让我们的敌人值得成为我们的敌人!
您将在本部分中学习到的内容:
· 如何使用 AnimationPlayer 节点。
· 如何使用 RayCast2D 节点。
· 如何使用调制值。
· 如何复制/粘贴节点以及复制对象。
敌人射击
之前,我们在敌人脚本中添加了一些尚未使用的子弹和攻击变量。我们无法控制敌人,因此我们需要某种方式来确定他们是否面对我们。我们可以使用RayCast2D节点,它将创建一条射线或线,该射线或线将击中敌人周围有碰撞的节点。然后,将使用此射线投射来查看它们是否击中了玩家的碰撞(称为“玩家”)。如果是,我们将触发敌人向我们射击,因为这意味着他们面对着我们。这将产生一颗子弹,如果击中我们的玩家,将对我们造成伤害。
让我们将此节点添加到我们的敌人场景树中。
您将看到一条射线或箭头现在从您的敌人那里射出。您可以在 Inspector 面板中更改此射线的长度。我现在将我的设置为 50。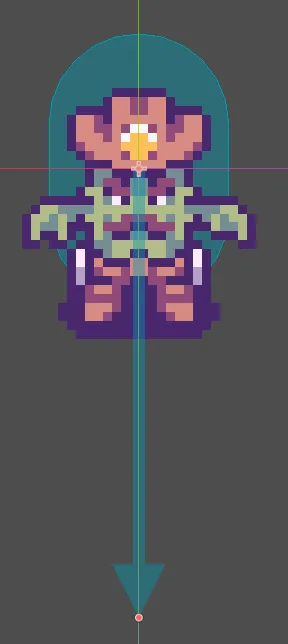
我们想将这条射线移向敌人所面对的方向。由于我们在_physics_process()函数中执行了所有移动代码,因此我们可以在那里执行此操作。我们将射线投射方向转向敌人,乘以他们的射线投射箭头长度的值(对我来说是 50)。这是他们能够撞击其他碰撞的程度。
### Enemy.gd

extends CharacterBody2D

# Node refs
@onready var player = get_tree().root.get_node("Main/Player")
@onready var animation_sprite = $AnimatedSprite2D
@onready var animation_player = $AnimationPlayer
@onready var timer_node = $Timer
@onready var ray_cast = $RayCast2D

# older code

# ------------------------- Movement & Direction ---------------------
# Apply movement to the enemy
func _physics_process(delta):
    var movement = speed * direction * delta
    var collision = move_and_collide(movement)

    #if the enemy collides with other objects, turn them around and re-randomize the timer countdown
    if collision != null and collision.get_collider().name != "Player":
        #direction rotation
        direction = direction.rotated(rng.randf_range(PI/4, PI/2))
        #timer countdown random range
        timer = rng.randf_range(2, 5)
    #if they collide with the player
    #trigger the timer's timeout() so that they can chase/move towards our player
    else:
        timer = 0
    #plays animations only if the enemy is not attacking
    if !is_attacking:
        enemy_animations(direction)
    # Turn RayCast2D toward movement direction
    if direction != Vector2.ZERO:
       ray_cast.target_position = direction.normalized() * 50
如果您在“调试”菜单中启用碰撞可见性,并运行游戏,您将看到敌人四处奔跑,射线投射会击中他们所面对方向的任何碰撞。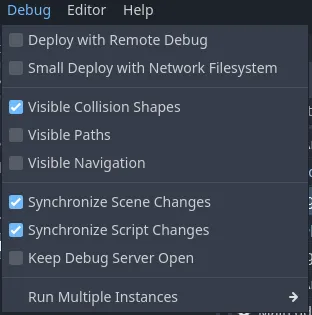
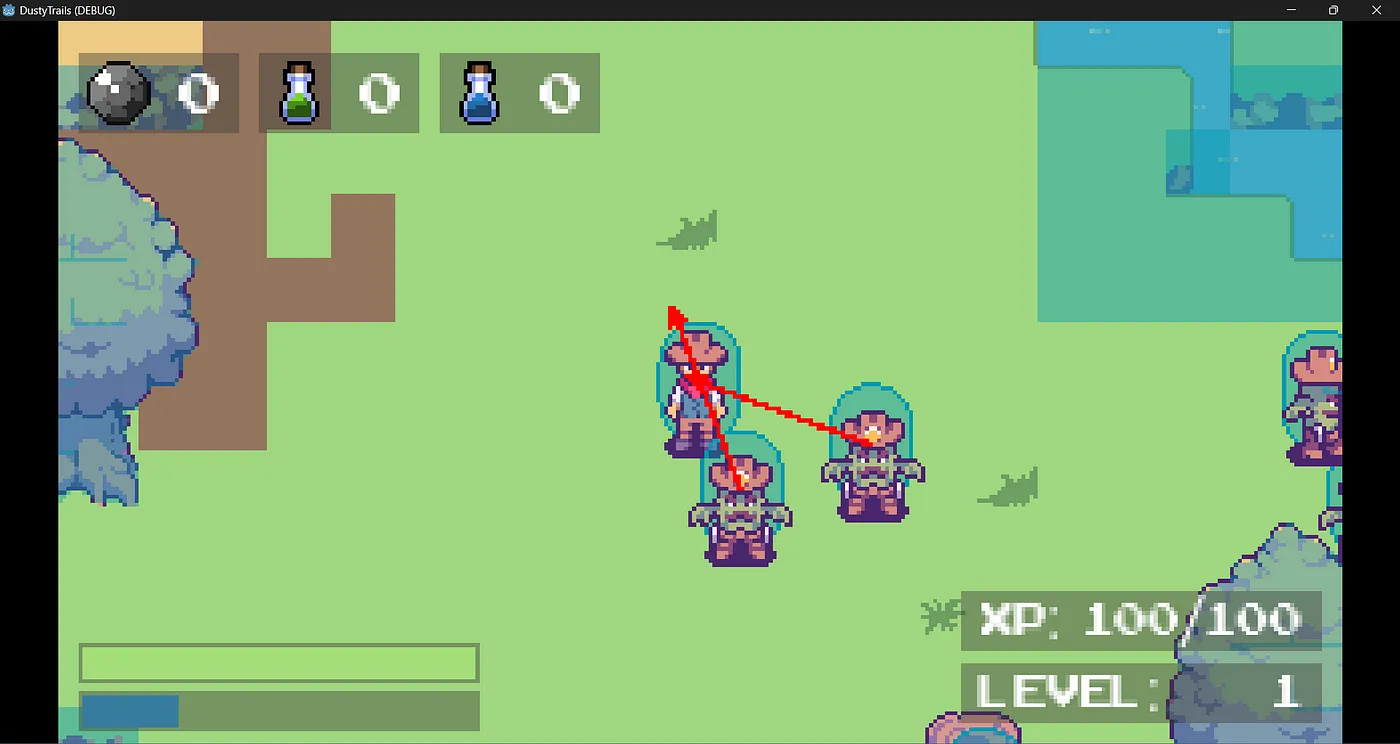
让我们将我们的播放器组织到一个名为“播放器”的新组下。
现在,我们可以更改process()函数,使其在与“player”组中的节点发生碰撞时生成子弹并播放敌人的射击动画。整个过程类似于ui_attack下的 Player 代码— 无需计算时间。
### Enemy.gd

# older code

#------------------------------------ Damage & Health ---------------------------
func _process(delta):
    #regenerates our enemy's health
    health = min(health + health_regen * delta, max_health)
    #get the collider of the raycast ray
    var target = ray_cast.get_collider()
    if target != null:
        #if we are colliding with the player and the player isn't dead
        if target.is_in_group("player"):
            #shooting anim
            is_attacking = true
            var animation  = "attack_" + returned_direction(new_direction)
            animation_sprite.play(animation)
产卵子弹
我们还将在我们的func _on_animated_sprite _finished():函数中生成子弹,因为只有在播放完射击动画后,我们才希望将子弹添加到主场景中。在实例化场景之前,我们需要为敌人创建一个 Bullet 场景。这是因为我们现有的 Bullet 场景被告知要忽略与玩家的碰撞,因此复制我们现有的场景并替换代码以忽略敌人会更容易。
继续复制 Bullet 场景和脚本,然后将它们重命名为 EnemyBullet.tscn 和 EnemyBullet.gd。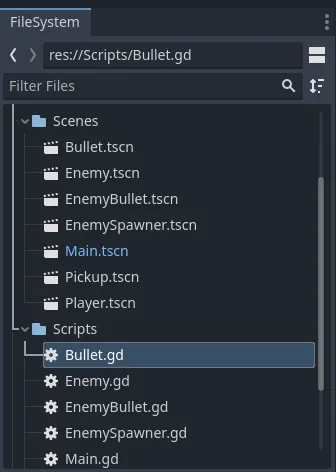
将新复制的场景根重命名为 EnemyBullet,并将 EnemyBullet 脚本附加到该脚本。同时将 Timer 和 AnimationPlayer 的信号重新连接到 EnemyBullet 脚本,而不是 Bullet 脚本。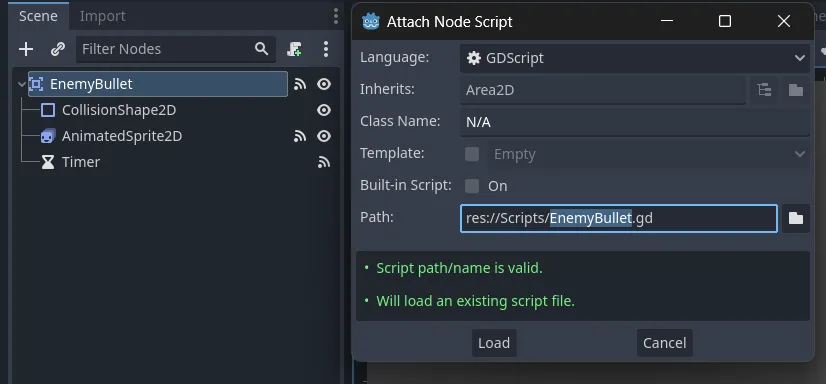
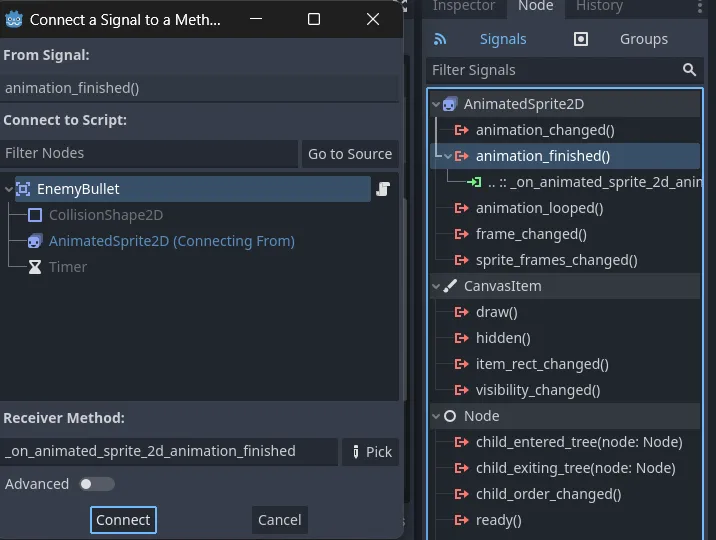
在 EnemyBullet 脚本中,在on_body_entered () 函数中交换“Player”和“Enemy”字符串。
### EnemyBullet.gd

# older code

# ---------------- Bullet -------------------------
# Position
func _process(delta):
    position = position + speed * delta * direction

# Collision
func _on_body_entered(body):
    # Ignore collision with Enemy
    if body.is_in_group("enemy"):
        return
    # Ignore collision with Water
    if body.name == "Map":
        #water == Layer 0
        if tilemap.get_layer_name(Global.WATER_LAYER):
            return
    # If the bullets hit player, damage them
    if body.is_in_group("player"):
        body.hit(damage)
    # Stop the movement and explode
    direction = Vector2.ZERO
    animated_sprite.play("impact")
现在在您的全局脚本中,预加载 EnemyBullet 场景。
### Global.gd
extends Node
# Scene resources
@onready var pickups_scene = preload("res://Scenes/Pickup.tscn")
@onready var enemy_scene = preload("res://Scenes/Enemy.tscn")
@onready var bullet_scene = preload("res://Scenes/Bullet.tscn")
@onready var enemy_bullet_scene = preload("res://Scenes/EnemyBullet.tscn")
现在,我们可以回到敌人场景,并在func _on_animated_sprite_2d_animation_finished()函数中生成子弹。我们必须创建另一个 EnemyBullet 场景实例,在其中更新其伤害、方向和位置,作为敌人发射子弹时所面对的方向,以及敌人前方 8 个像素的位置 — 因为我们希望他们的射程比我们的玩家更远。
### Enemy.gd
# older code
# Bullet & removal
func _on_animated_sprite_2d_animation_finished():
    if animation_sprite.animation == "death":
        get_tree().queue_delete(self)
    is_attacking = false
    # Instantiate Bullet
    if animation_sprite.animation.begins_with("attack_"):
        var bullet = Global.enemy_bullet_scene.instantiate()
        bullet.damage = bullet_damage
        bullet.direction = new_direction.normalized()
        # Place it 8 pixels away in front of the enemy to simulate it coming from the guns barrel
        bullet.position = player.position + new_direction.normalized() * 8
        get_tree().root.get_node("Main").add_child(bullet)
攻击玩家
现在我们需要继续在 Player 脚本中添加一个 damage 函数,以便EnemyBullet 脚本中的body.hit(damage)代码可以工作。在此之前,我们还将把我们添加到 Enemy 的 damage 动画添加到 Player 中。如果您想练习使用 AnimationPlayer,您可以重新创建它,但我只是要从 Enemy 场景复制节点并将其粘贴到 Player 场景中。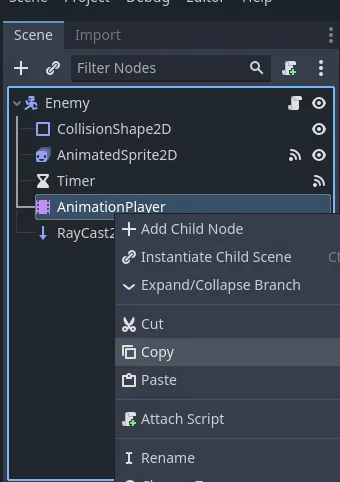
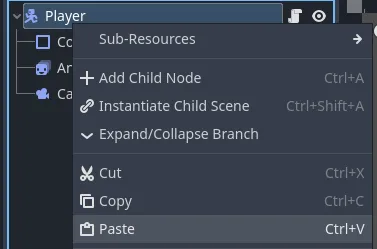
因为我们的玩家场景中已经有一个 AnimatedSprite2D 节点,所以它会自动将动画连接到我们的调制值。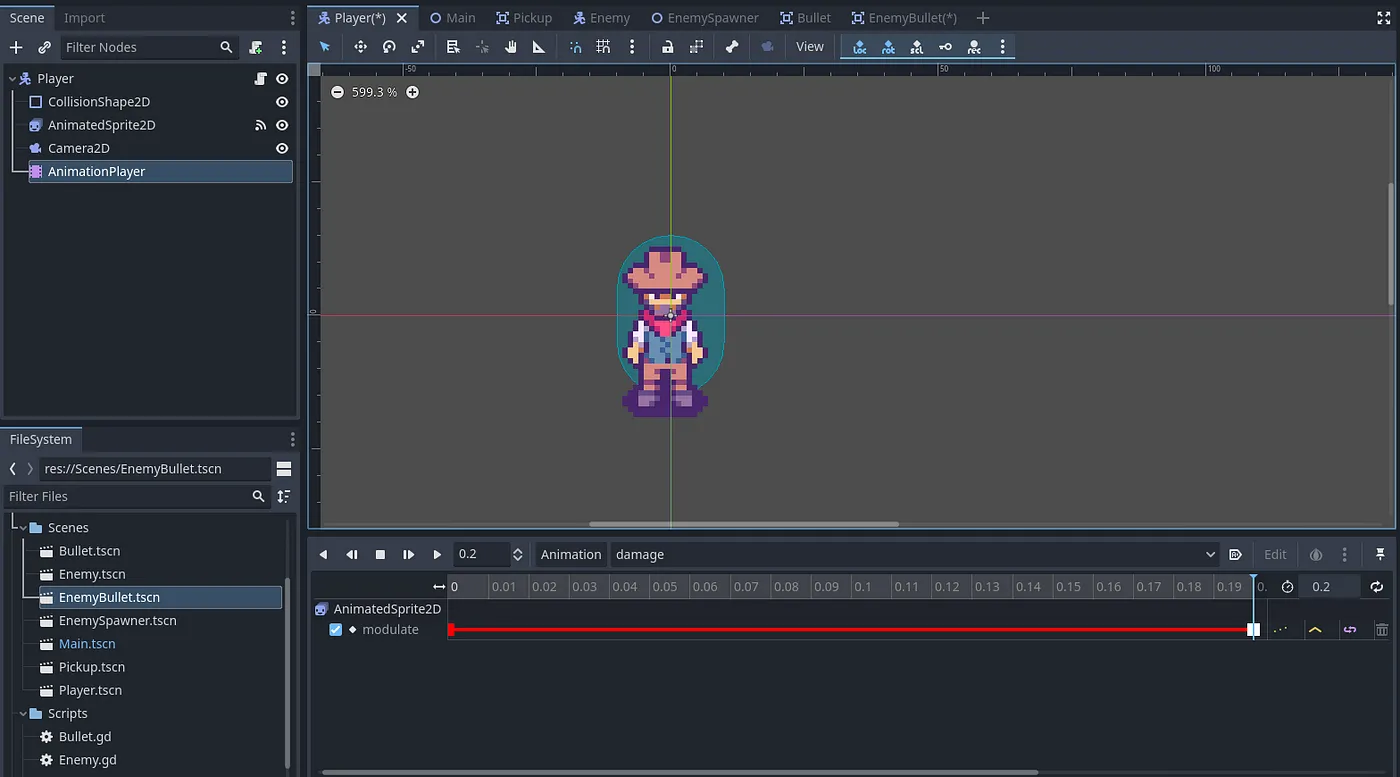
在我们的代码中,我们可以继续创建伤害函数。此函数类似于我们在敌人场景中创建的函数,在该场景中,我们被子弹击中后会受到伤害。红色的“伤害”指示动画也会根据伤害播放,并且我们的健康值会更新。我们不会在这一部分中添加死亡功能,因为我们想在下一部分中与游戏结束屏幕一起实现它。
### Player.gd
extends CharacterBody2D
# Node references
@onready var animation_sprite = $AnimatedSprite2D
@onready var health_bar = $UI/HealthBar
@onready var stamina_bar = $UI/StaminaBar
@onready var ammo_amount = $UI/AmmoAmount
@onready var stamina_amount = $UI/StaminaAmount
@onready var health_amount = $UI/HealthAmount
@onready var animation_player = $AnimationPlayer
# older code
# ------------------- Damage & Death ------------------------------
#does damage to our player
func hit(damage):
    health -= damage
    health_updated.emit(health, max_health)
    if health > 0:
        #damage
        animation_player.play("damage")
        health_updated.emit(health)
    else:
        #death
        set_process(false)
        #todo: game overYour final code should look like this.
现在如果你运行你的场景,你的敌人应该追逐你并向你射击,当子弹击中你的玩家节点时,它会降低玩家的健康值。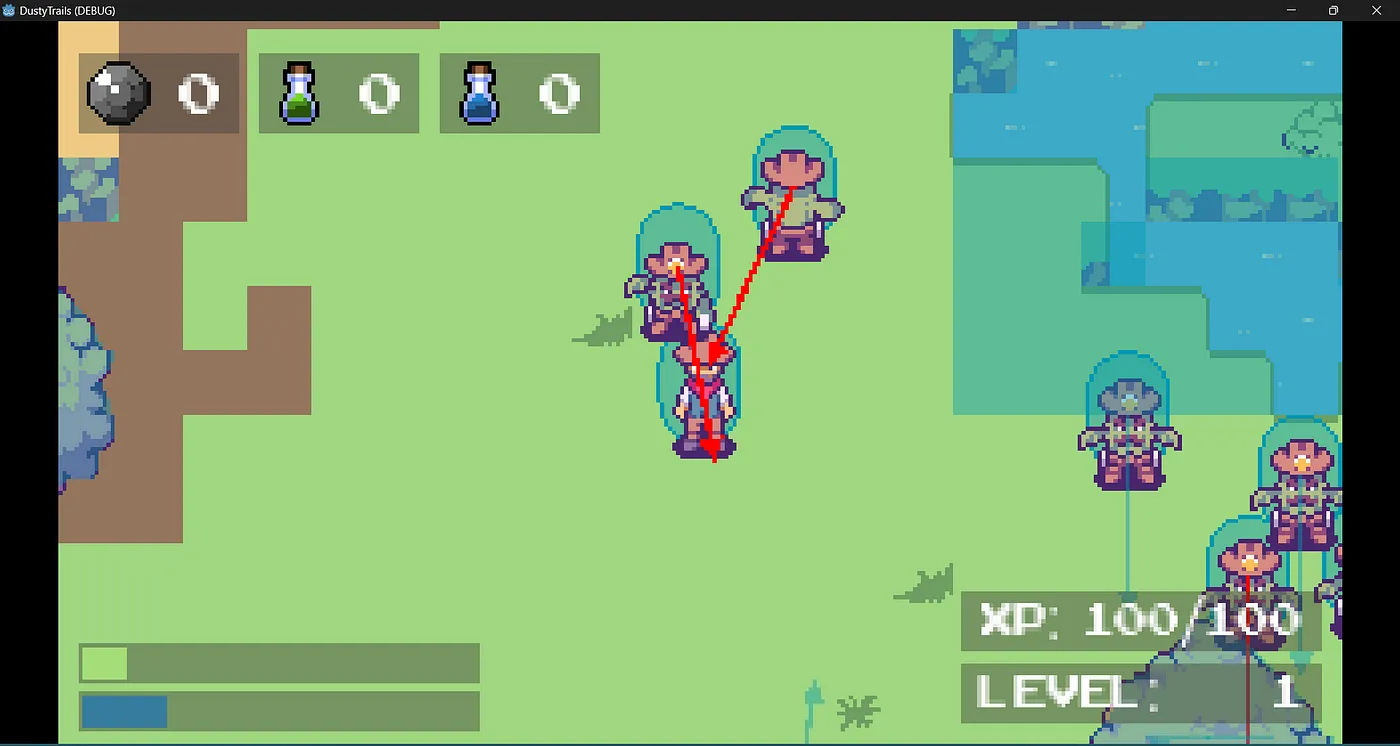
我们还需要将动画播放器的 animation_finished() 信号连接到主脚本并在那里重置我们的值,这样即使动画在完成过程中卡住了,它也会重置调制。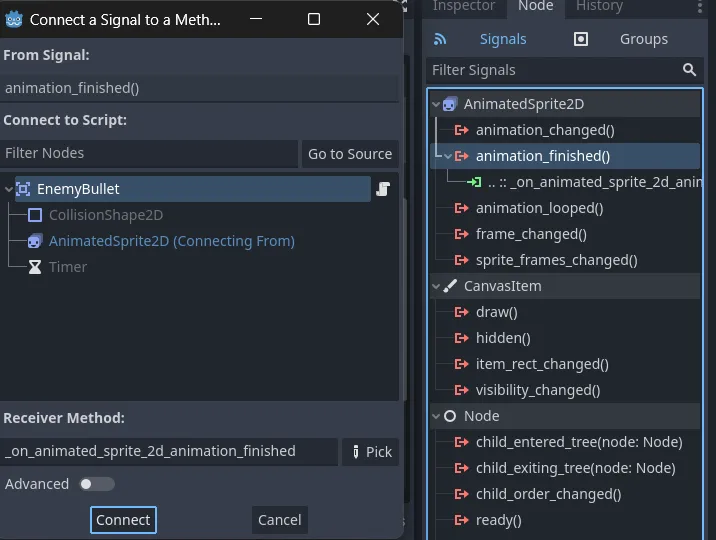
### Player.gd
func _ready():
    # Connect the signals to the UI components' functions
    health_updated.connect(health_bar.update_health_ui)
    stamina_updated.connect(stamina_bar.update_stamina_ui)
    ammo_pickups_updated.connect(ammo_amount.update_ammo_pickup_ui)
    health_pickups_updated.connect(health_amount.update_health_pickup_ui)
    stamina_pickups_updated.connect(stamina_amount.update_stamina_pickup_ui)
    # Reset color
    animation_sprite.modulate = Color(1,1,1,1)
func _on_animation_player_animation_finished(anim_name):
    # Reset color
    animation_sprite.modulate = Color(1,1,1,1)
恭喜,你现在有了一个可以射击玩家的敌人!接下来,我们将赋予玩家死亡的能力,并实现游戏结束系统。记得保存你的项目,下一部分见。
本节代码下载。

