让我们通过制作 RPG 来学习 Godot 4 — 第 17 部分:基本 NPC 和任务
现在我们已经设置了大部分游戏,我们可以继续创建一个带有任务的 NPC。请注意,这个任务系统不会是一个带有任务链的动态系统。不,不幸的是,这个任务系统只包含一个带有对话和状态树的简单收集任务。我把它保留为这个简单的系统,因为对话、任务甚至库存系统都非常复杂,因此我将制作一个单独的教程系列,单独关注这些高级概念!
您将在本部分中学习到的内容:
· 如何处理游戏状态。
· 如何添加对话树。
· 进一步练习弹出窗口和动画。
· 如何使用 InputEventKey 对象。
· 如何向节点添加组。
· 如何使用 RayCast2D 节点。
如果您对这些系统如何工作感到好奇,这里有一些书面资源可以让您了解如何实现这一点:
https://github.com/christinec-dev/DustyTrailsParts/tree/main/Notes
https://www.reddit.com/r/godot/comments/m3ghec/how_to_build_a_dialog_system_without_ sell_your/
https://worldeater-dev.itch.io/bittersweet-birthday/devlog/224241/howto-a-simple-dialogue-system-in-godot
https://www.linkedin.com/advice/1/what-best-ways-design-dynamic-immersive-quests-open-world
https://medium.com/@thrivevolt/making-a-grid-inventory-system-with-godot-727efedb71f7
NPC 设置
让我们创建我们的 NPC 场景。在您的项目中,创建一个新场景,以 CharacterBody2D 节点作为场景根,以 AnimatedSprite2D 和 CollisionBody2D 节点作为其子节点。将碰撞节点的碰撞形状设为 RectangleShape。将此场景保存在您的 Scenes 文件夹下。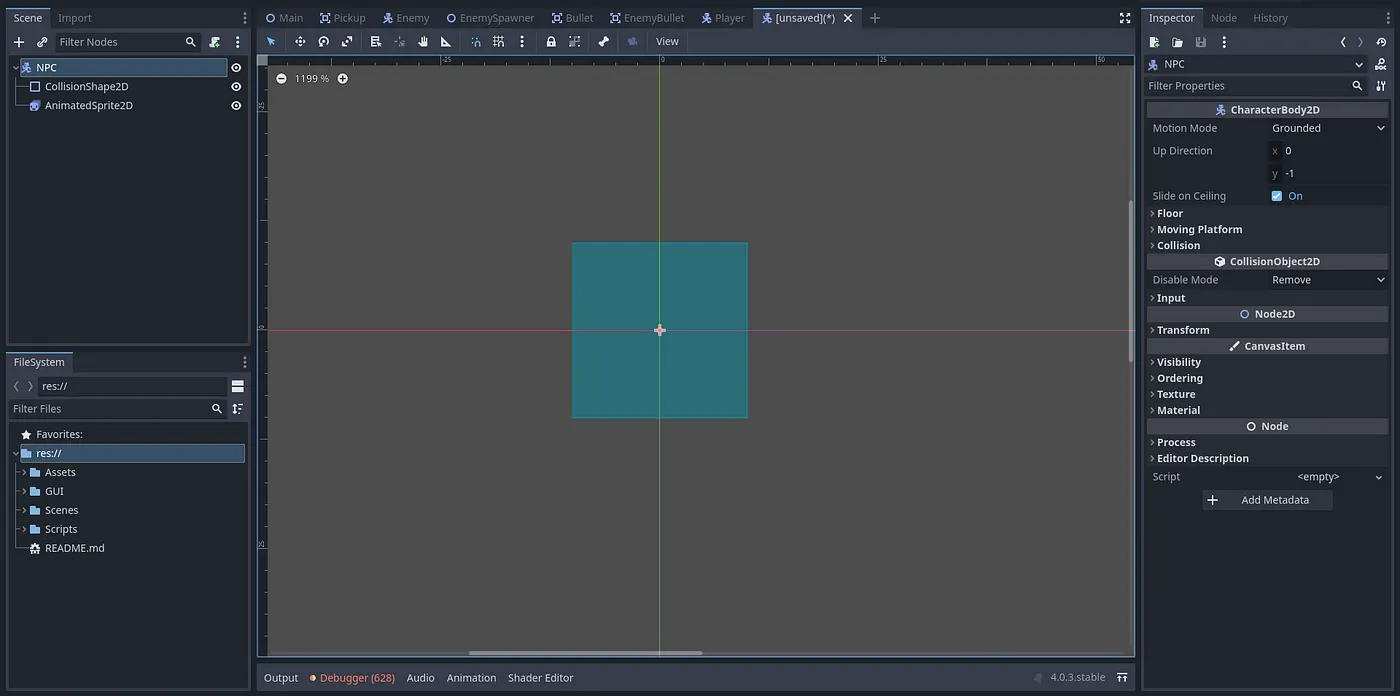
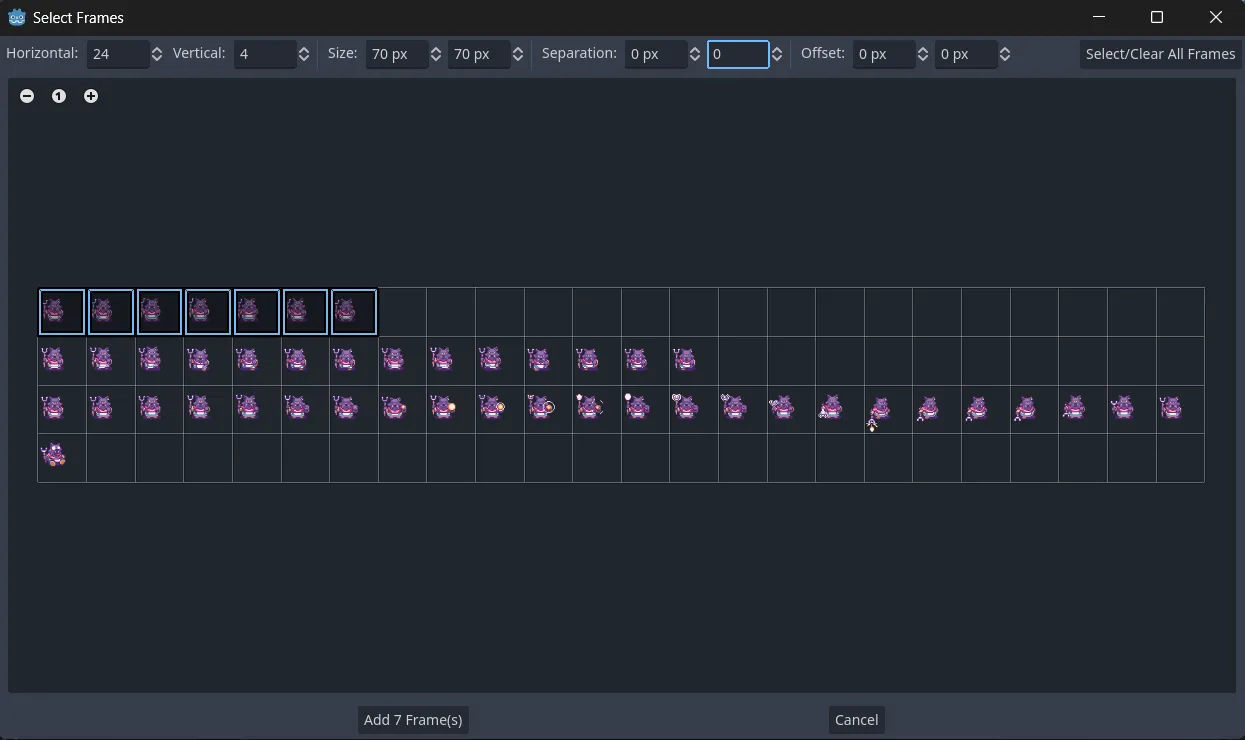
让我们向 AnimatedSprite2D 节点添加两个新动画:idle_down 和 talk_down。您可以在 Assets > Mobs > Coyote 下找到我为此节点使用的动画精灵表。
idle动画:

talk_down动画:
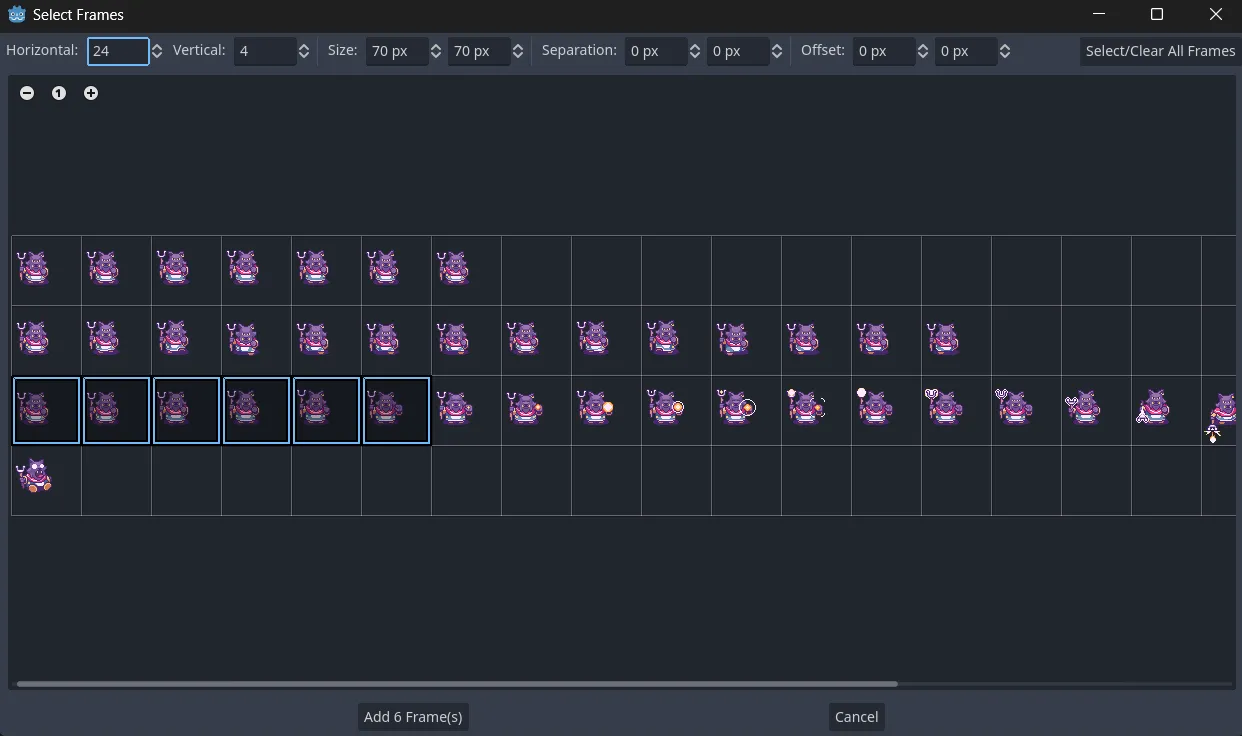

目前,我们的 NPC 将固定在一个地方,他们不会攻击我们的敌人。如果您想让我向您展示如何让他们在地图上漫游并攻击敌人,反之亦然,请告诉我。将 FPS 和循环保留为默认值。
请确保你的精灵位于 CollisionShape 的中间。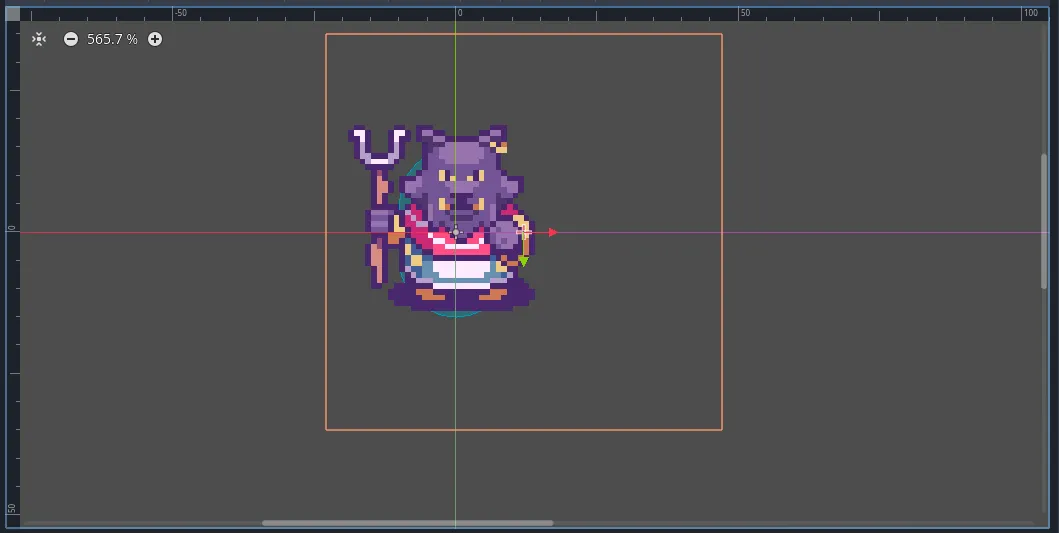
将脚本附加到您的 NPC 场景并将其保存在您的脚本文件夹下。
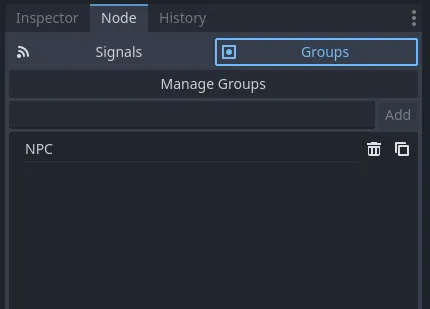
我们还想向此节点添加一个组,以便我们的玩家在与其交互时可以检查特殊的“NPC”组。我们还必须向玩家添加一个 RayCast2D 节点,以便我们可以检查其“目标”,如果该目标是 NPC 组的一部分,我们将启动与 NPC 交谈的功能。
对话框弹出和播放器设置
现在,在您的 Player 场景中,我们需要创建另一个弹出节点,当玩家与 NPC 交互时,该节点将可见。添加一个新的 CanvasLayer 节点并将其重命名为“DialogPopup”。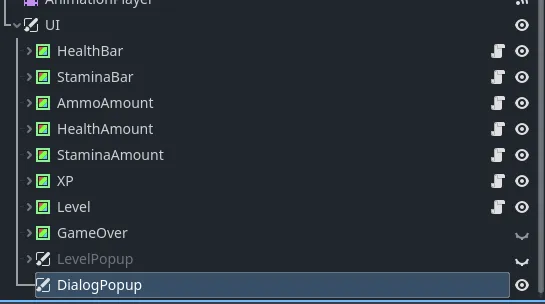
在这个 DialogPopup 节点中,我们添加一个 ColorRect,并以三个 Label 节点作为其子节点。将其重命名如下: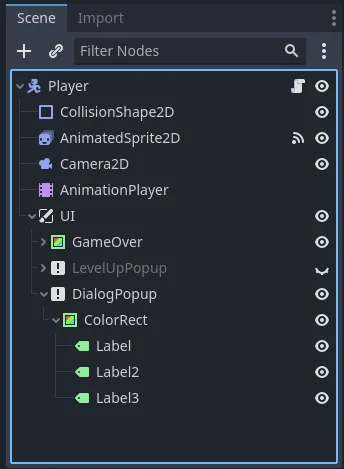
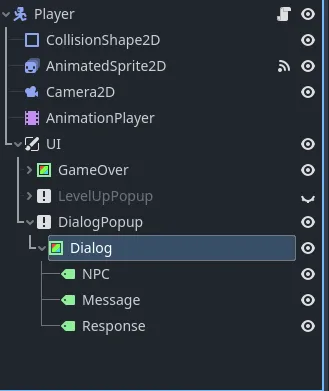
选择 Dialog 节点并将其 Color 属性更改为 #581929。更改其大小 (x: 310, y: 70) 和其 anchor_preset (center_bottom)。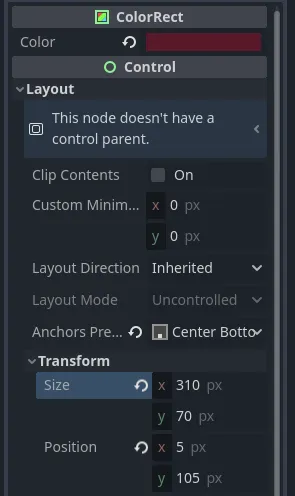
选择你的 NPC Label 节点,将其文本更改为“Name”。更改其大小 (x: 290, y: 26);位置 (x: 5, y: 2)。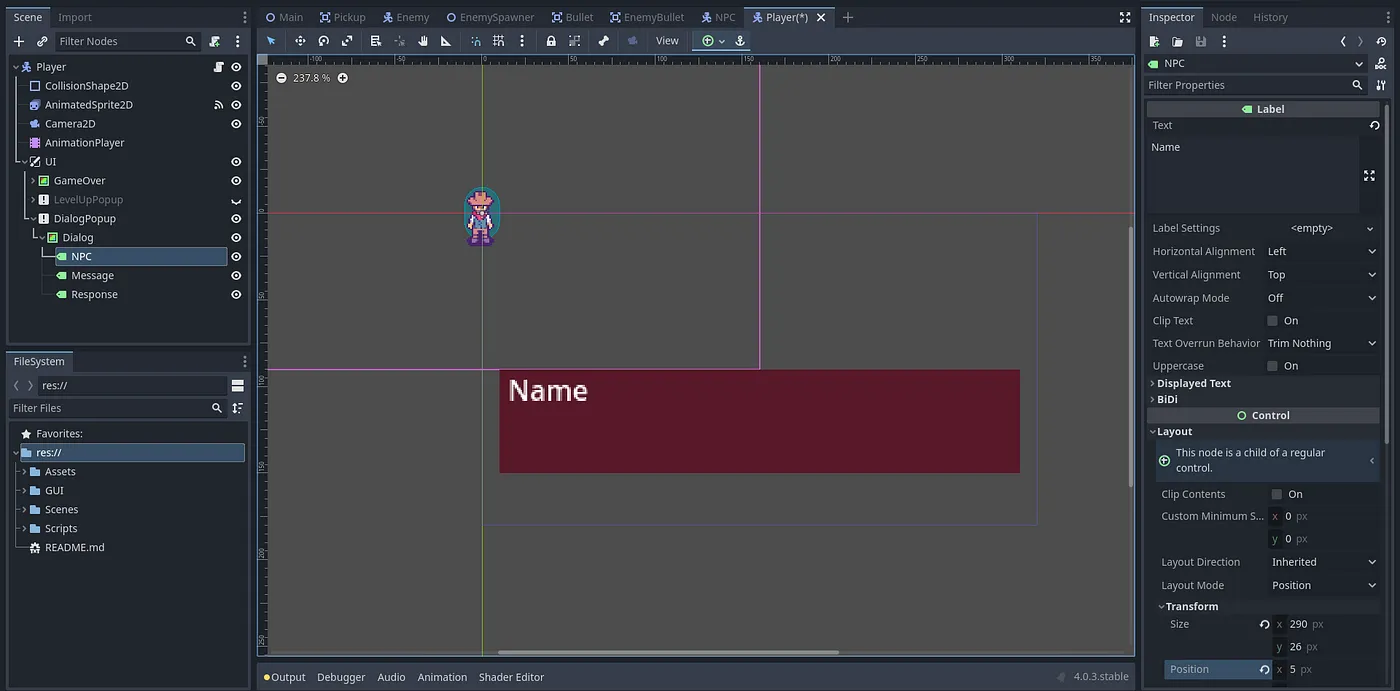
现在将其字体更改为“Scrondinger”,并将其字体大小更改为 10。我们还想更改其字体颜色,因此在颜色 > 字体颜色下,将颜色更改为 #B26245。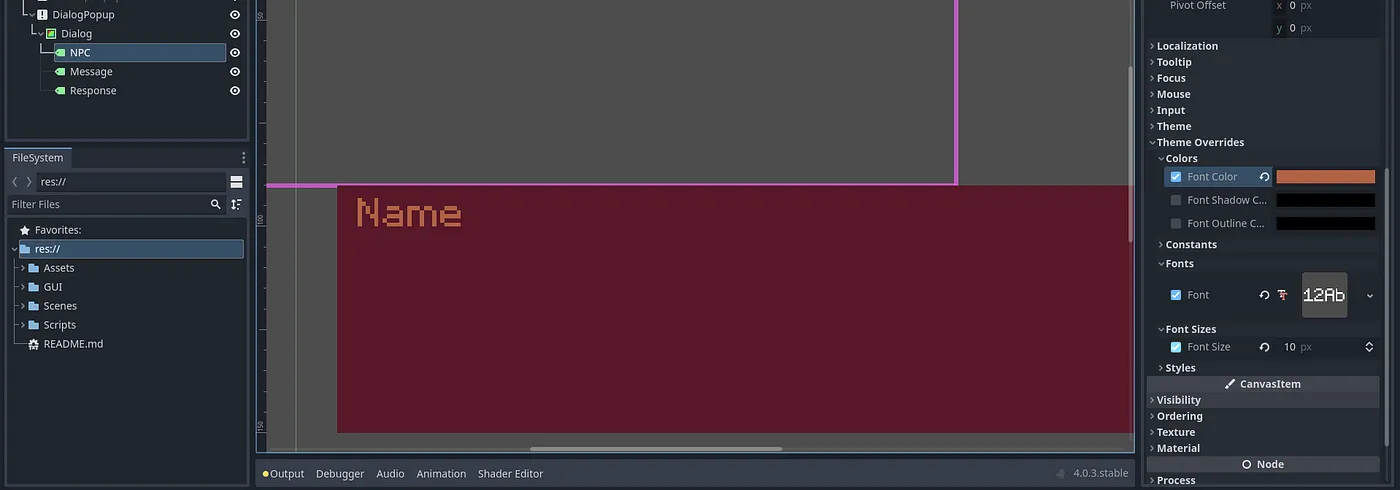
选择您的 Message Label 节点并将其文本更改为“Text here…”。更改其大小 (x: 290, y: 30);位置 (x: 5, y: 15)。同时将其字体更改为“Scrondinger”,字体大小更改为 10。AutoWrap 属性也应设置为“Word”。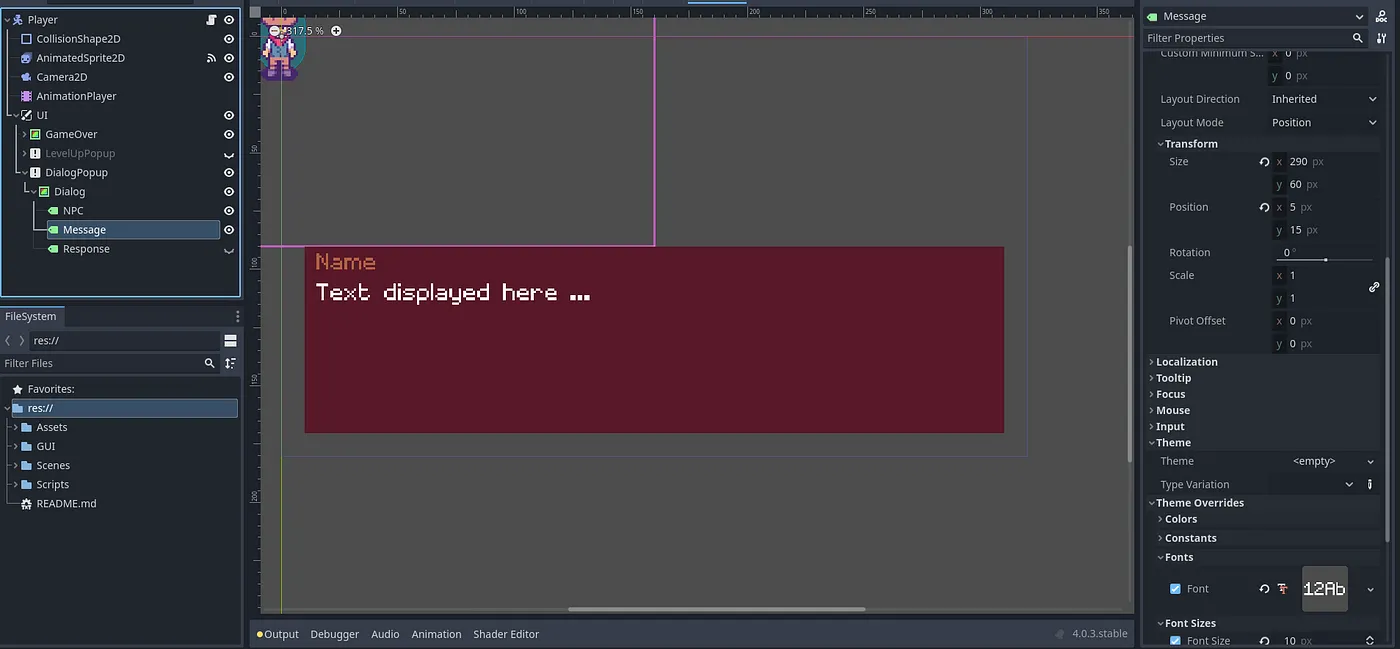
选择您的 Response Label 节点并将其文本更改为“Answer”。更改其大小(x:290,y:16);位置(x:5,y:60);水平和垂直对齐(居中)。此外,将其字体更改为“Scrondinger”,字体大小更改为 10。在颜色 > 字体颜色下,将颜色更改为 #D6c376。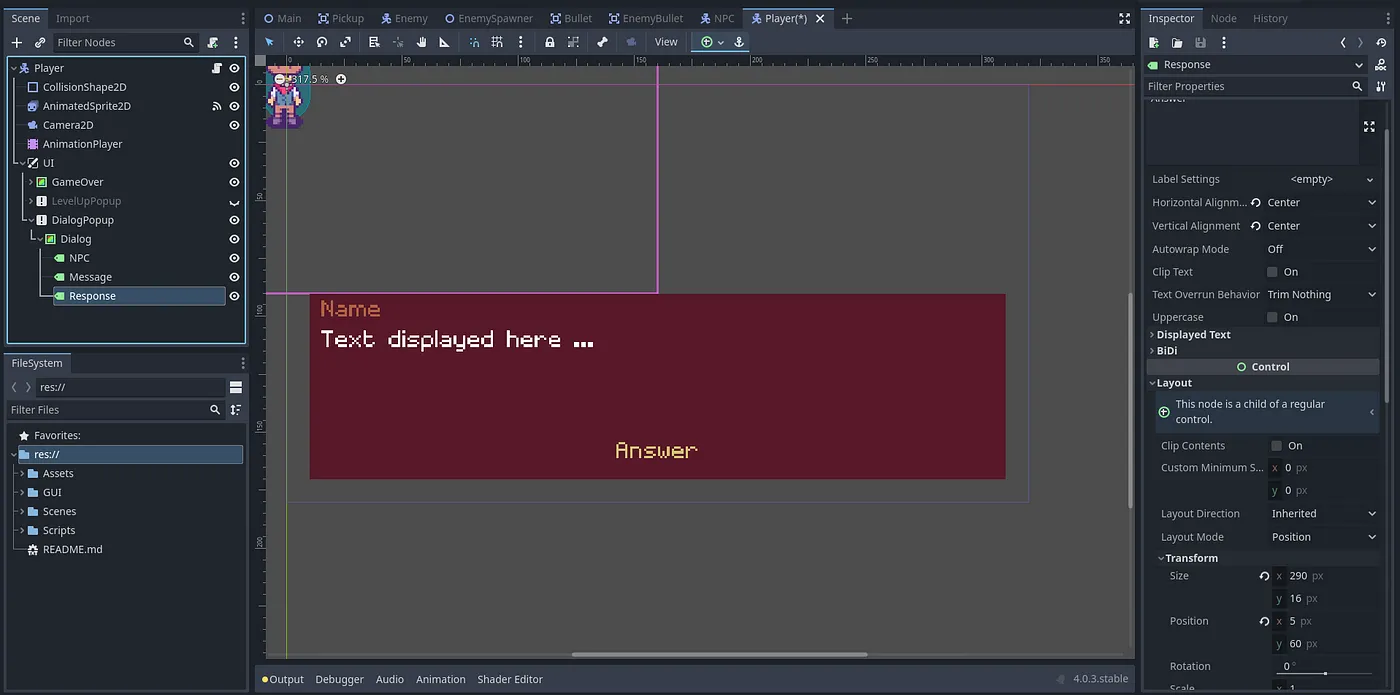
将 DialogPopup 的可见性更改为隐藏,并在 UI 层之前添加 RayCast2D 节点。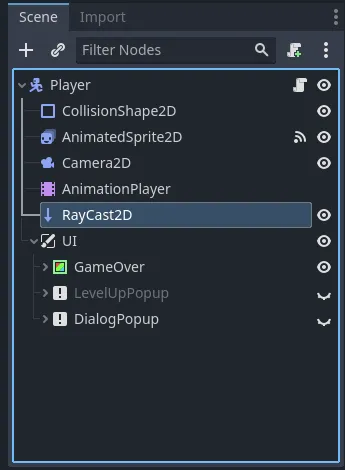
在您的 Player 脚本中,我们必须执行与在 Enemy 脚本中相同的操作,将射线投射节点的方向设置为与角色的方向相同。在您的 _physics_process() 函数中,让我们转动 RayCast2D 节点以跟随玩家的移动方向。
### Player.gd

extends CharacterBody2D

# Node references
@onready var animation_sprite = $AnimatedSprite2D
@onready var health_bar = $UI/HealthBar
@onready var stamina_bar = $UI/StaminaBar
@onready var ammo_amount = $UI/AmmoAmount
@onready var stamina_amount = $UI/StaminaAmount
@onready var health_amount = $UI/HealthAmount
@onready var xp_amount = $UI/XP
@onready var level_amount = $UI/Level
@onready var animation_player = $AnimationPlayer
@onready var level_popup = $UI/LevelPopup
@onready var ray_cast = $RayCast2D

# --------------------------------- Movement & Animations -----------------------------------
func _physics_process(delta):
    # Get player input (left, right, up/down)
    var direction: Vector2
    direction.x = Input.get_action_strength("ui_right") - Input.get_action_strength("ui_left")
    direction.y = Input.get_action_strength("ui_down") - Input.get_action_strength("ui_up")
    # Normalize movement
    if abs(direction.x) == 1 and abs(direction.y) == 1:
        direction = direction.normalized()
    # Sprinting
    if Input.is_action_pressed("ui_sprint"):
        if stamina >= 25:
            speed = 100
            stamina = stamina - 5
            stamina_updated.emit(stamina, max_stamina)
    elif Input.is_action_just_released("ui_sprint"):
        speed = 50
    # Apply movement if the player is not attacking
    var movement = speed * direction * delta
    if is_attacking == false:
        move_and_collide(movement)
        player_animations(direction)
    # If no input is pressed, idle
    if !Input.is_anything_pressed():
        if is_attacking == false:
            animation  = "idle_" + returned_direction(new_direction)
    # Turn RayCast2D toward movement direction
    if direction != Vector2.ZERO:
        ray_cast.target_position = direction.normalized() * 50
此射线投射将击中任何指定了碰撞体的节点。我们希望它击中我们的 NPC,如果它击中了,我们按下交互按钮,它将启动对话框弹出窗口并运行对话框树。为此,我们需要首先添加一个新的输入操作,我们可以按下该操作来与 NPC 交互。
在项目设置中的输入操作菜单中,添加一个名为“ui_interact”的新输入并为其分配一个键。我将键盘上的 TAB 键分配给此操作。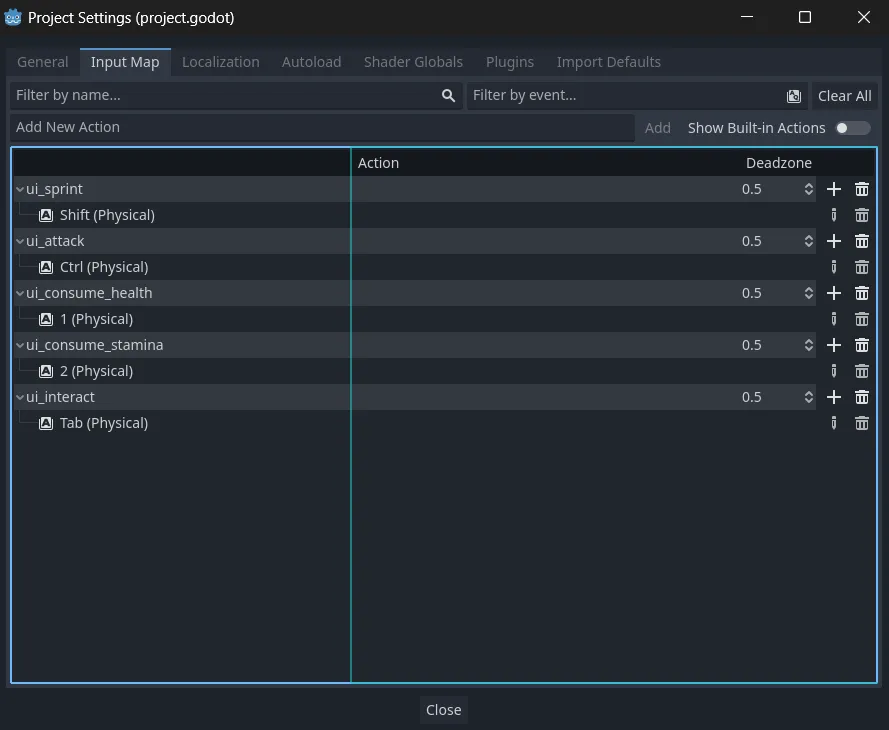
现在,在我们的 input() 函数中,我们将对其进行扩展,为我们的 ui_interact 操作添加一个输入事件。如果我们的玩家按下此按钮,我们的射线投射将捕获它击中的碰撞器,如果其中一个碰撞器属于“NPC”组,它将启动 NPC 对话框。我们在敌人场景中做过类似的事情。
### Player.gd

func _input(event):
    #input event for our attacking, i.e. our shooting
    if event.is_action_pressed("ui_attack"):
        #checks the current time as the amount of time passed in milliseconds since the engine started
        var now = Time.get_ticks_msec()
        #check if player can shoot if the reload time has passed and we have ammo
        if now >= bullet_fired_time and ammo_pickup > 0:
            #shooting anim
            is_attacking = true
            var animation  = "attack_" + returned_direction(new_direction)
            animation_sprite.play(animation)
            #bullet fired time to current time
            bullet_fired_time = now + bullet_reload_time
            #reduce and signal ammo change
            ammo_pickup = ammo_pickup - 1
            ammo_pickups_updated.emit(ammo_pickup)
    #using health consumables
    elif event.is_action_pressed("ui_consume_health"):
        if health > 0 && health_pickup > 0:
            health_pickup = health_pickup - 1
            health = min(health + 50, max_health)
            health_updated.emit(health, max_health)
            health_pickups_updated.emit(health_pickup)
    #using stamina consumables
    elif event.is_action_pressed("ui_consume_stamina"):
        if stamina > 0 && stamina_pickup > 0:
            stamina_pickup = stamina_pickup - 1
            stamina = min(stamina + 50, max_stamina)
            stamina_updated.emit(stamina, max_stamina)
            stamina_pickups_updated.emit(stamina_pickup)
    #interact with world
    elif event.is_action_pressed("ui_interact"):
        var target = ray_cast.get_collider()
        if target != null:
            if target.is_in_group("NPC"):
                # Talk to NPC
                #todo: add dialog function to npc
                return
接下来,我们希望 NPC 脚本更新 Player 场景标签(npc、消息和响应)中的 DialogPopup 节点。我们还希望它处理玩家对对话框响应的输入,因此如果玩家说“A”或“B”表示是/否,对话框弹出窗口将根据对话框树更新消息值。稍后设置对话框树时,我们将更深入地讨论这一点。
将新脚本附加到您的 DialogPopup 节点并将其保存在您的 GUI 文件夹下。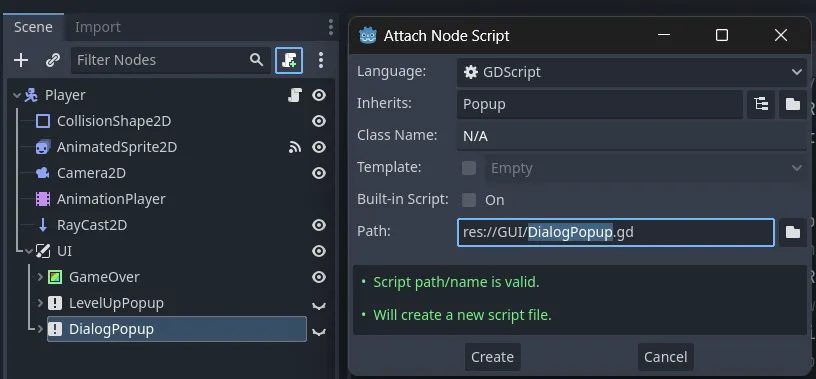
有时,您希望类的成员变量不仅能保存数据,还能在其值发生变化时执行一些验证或计算。您可能还希望以某种方式封装其访问。为此,GDScript 提供了一种特殊语法,可在变量声明后使用 set和 get关键字来定义属性。然后,您可以定义一个代码块,该代码块将在访问或分配变量时执行。
在这个脚本的顶部,我们需要声明一些变量。我们将使用 set/get 属性定义这些变量,这将允许我们根据从 NPC 脚本获取的数据设置标签值。我们还需要为我们的 NPC 引用定义一个变量。
### DialogPopup.gd

extends CanvasLayer

#gets the values of our npc from our NPC scene and sets it in the label values
var npc_name : set = npc_name_set
var message: set = message_set
var response: set = response_set

#reference to NPC
var npc
接下来,我们需要创建三个函数来设置 set/get 变量的值。这将捕获从我们的 NPC 传递的值并将该值分配给我们的标签。
### DialogPopup.gd

extends CanvasLayer

#gets the values of our npc from our NPC scene and sets it in the label values
var npc_name : set = npc_name_set
var message: set = message_set
var response: set = response_set

#reference to NPC
var npc

#sets the npc name with the value received from NPC
func npc_name_set(new_value):
    npc_name = new_value
    $Dialog/NPC.text = new_value

#sets the message with the value received from NPC
func message_set(new_value):
    message = new_value
    $Dialog/Message.text = new_value

#sets the response with the value received from NPC
func response_set(new_value):
    response = new_value
    $Dialog/Response.text = new_value
在继续执行此脚本之前,让我们向 Message 节点添加动画,使其具有打字机效果。这是 RPG 类型游戏中的经典功能,因此我们也将实现此功能。在 Godot 4 中,我们可以通过在 AnimationPlayer 中更改文本的可见比例来实现这一点。这将使我们的文本可见性从不可见慢慢过渡到可见。
在播放器场景中的 AnimationPlayer 节点中,添加一个名为“打字机”的新动画。
向您的动画添加新的属性轨迹 (Property Track),并将其分配给您的消息节点。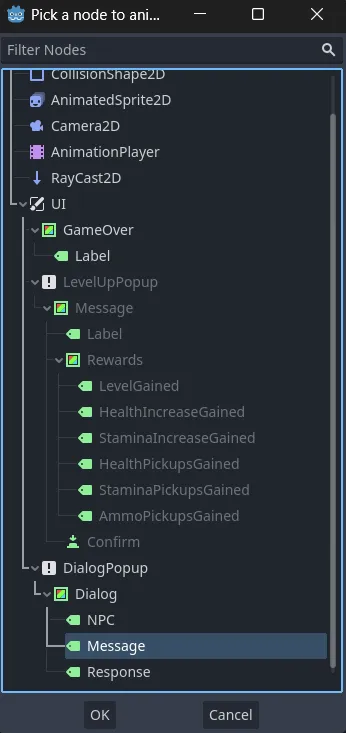
我们要改变的属性是对话框文本的可见比例。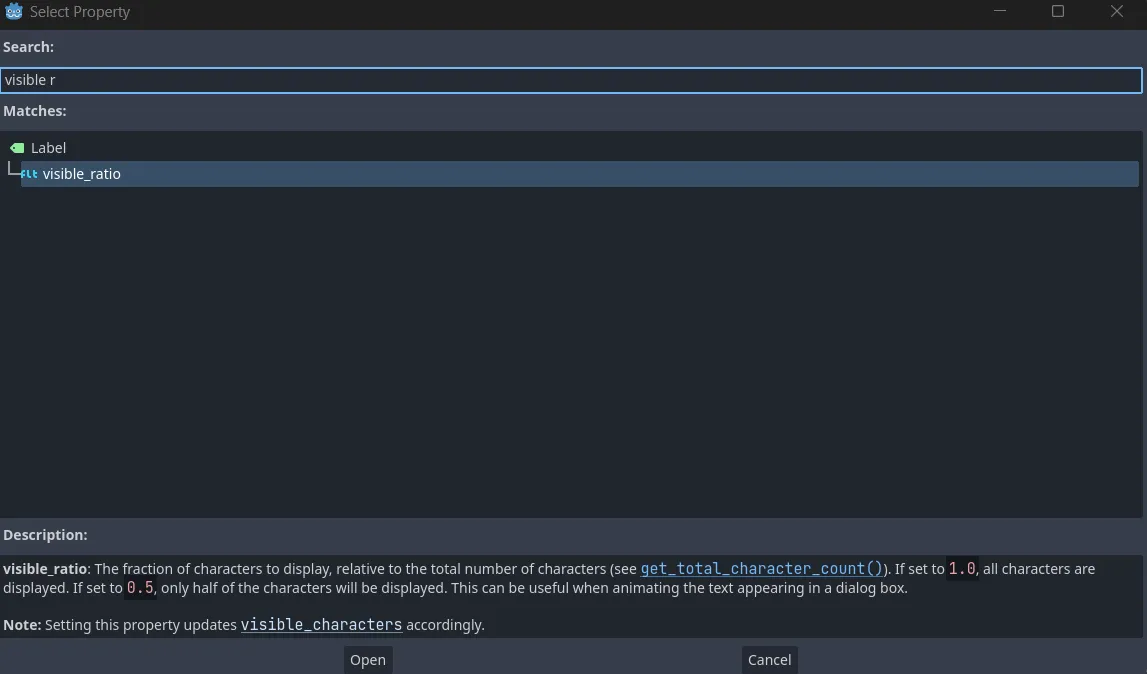
此可见比率将使对话比率可见性从 0 到 1。在 visible_ratio 轨道中,添加两个新关键帧,一个在关键帧 0,另一个在关键帧 1。
将关键帧 0 的值更改为 0,将关键帧 1 的值更改为 1。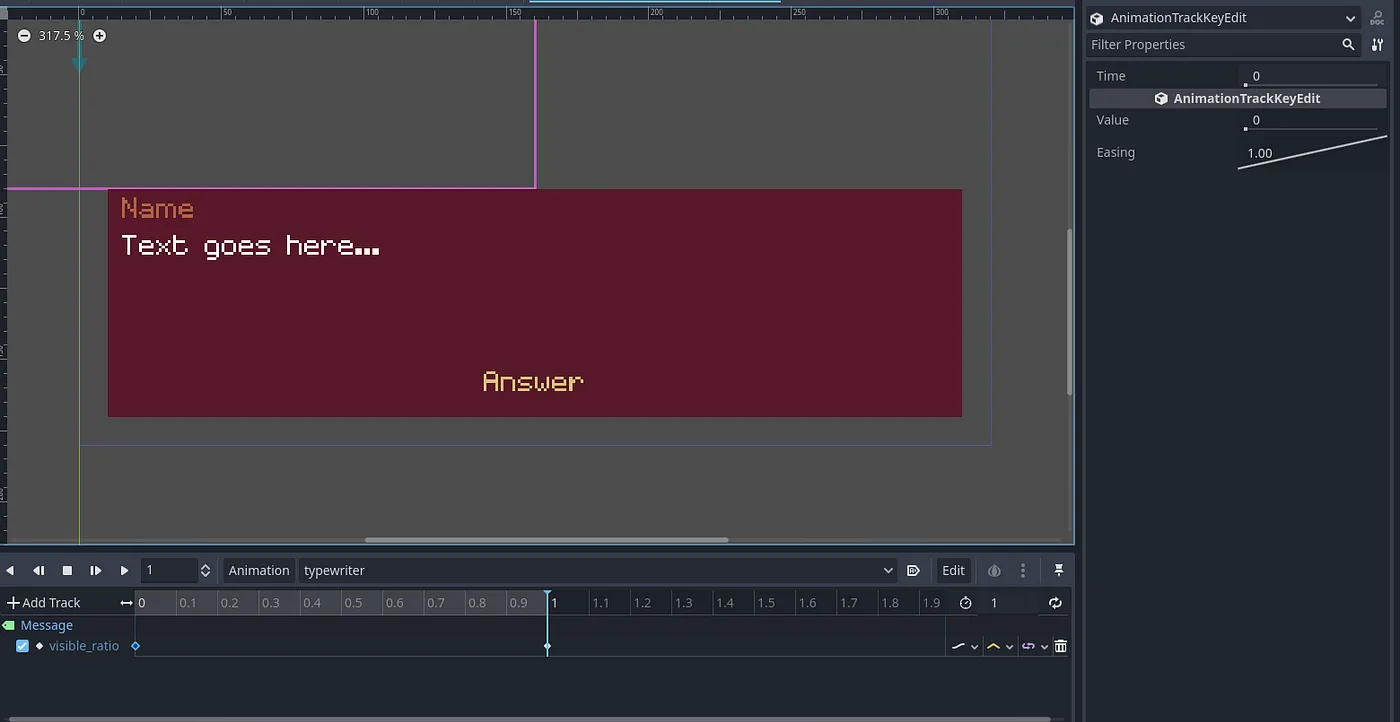
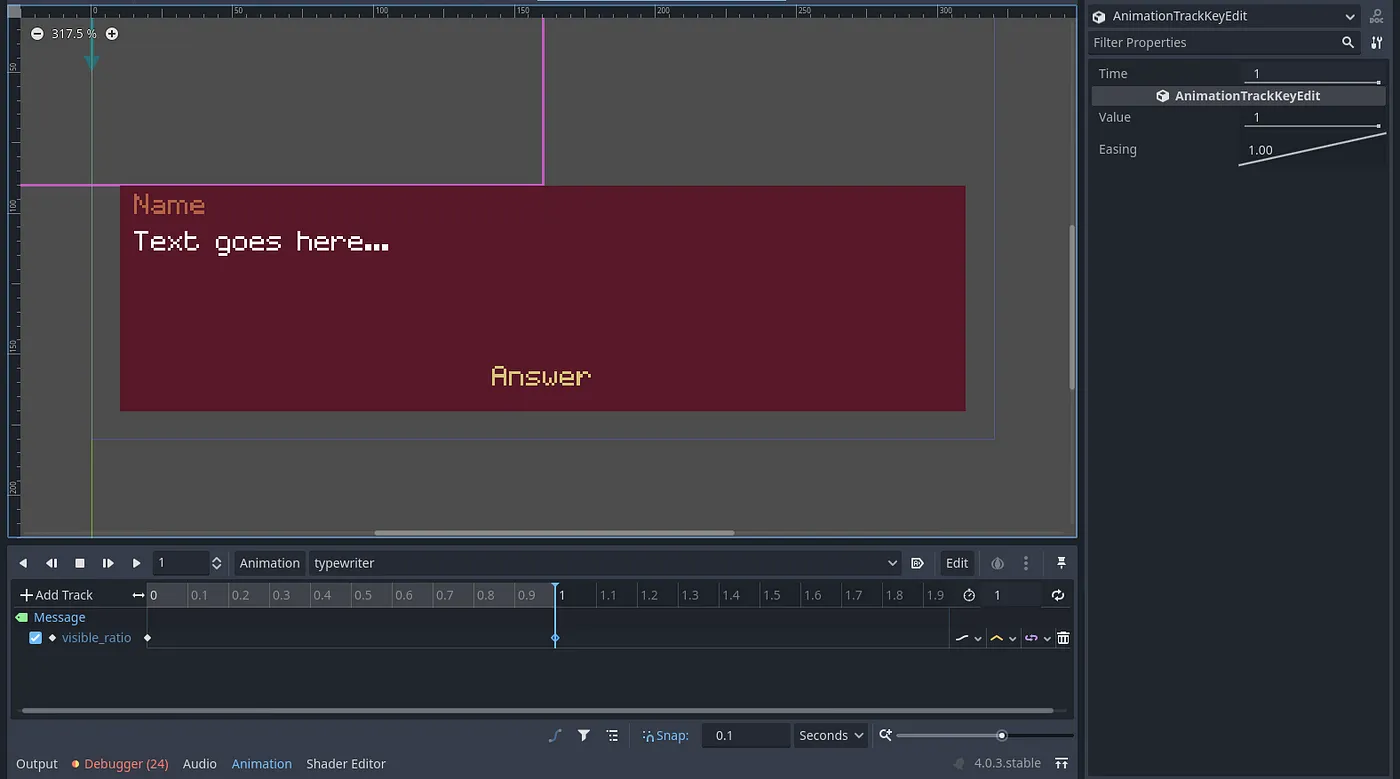
现在如果你播放动画,你的打字机效果就会起作用!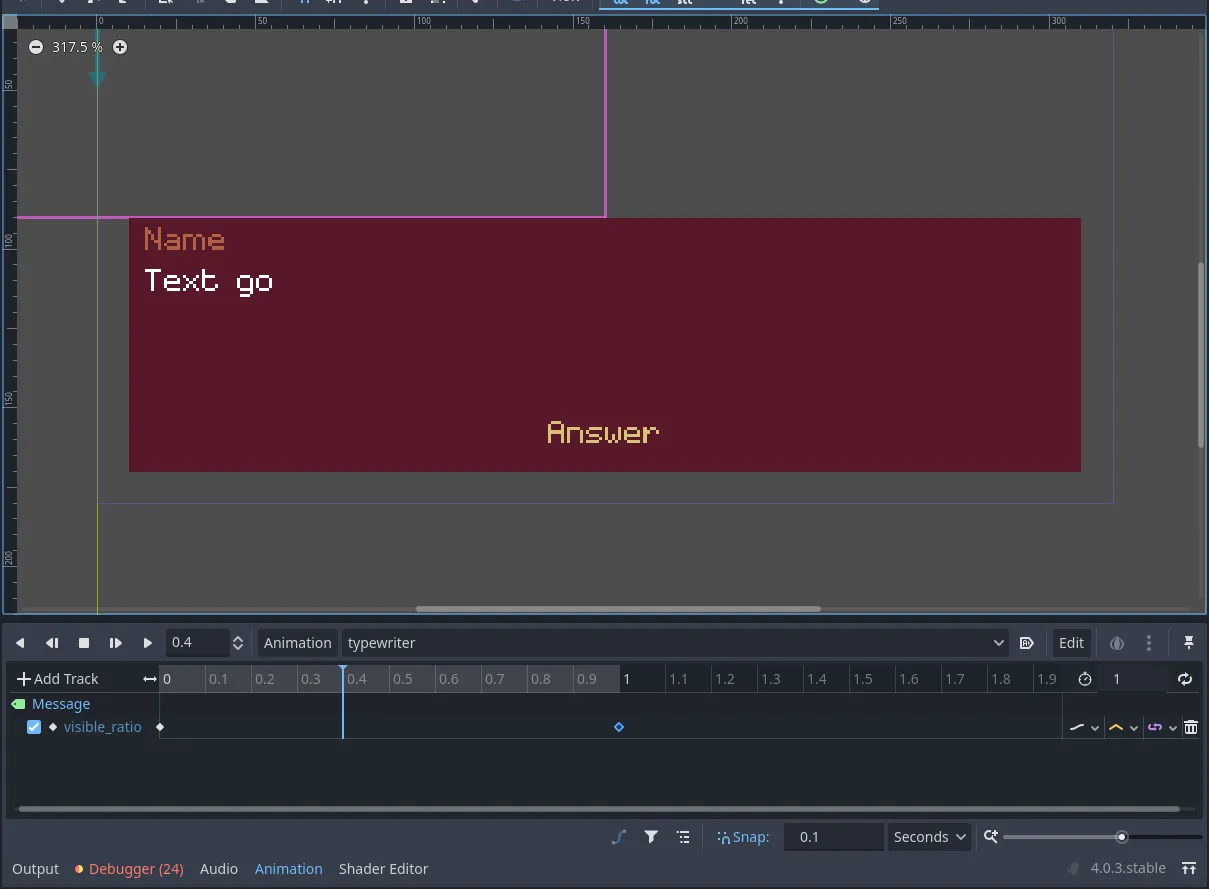
回到 DialogPopup 代码,让我们创建两个将由我们的 NPC 脚本调用的函数。第一个函数应该暂停游戏并显示对话框弹出窗口,并播放打字机动画。另一个函数应该隐藏对话框并取消暂停游戏。
### DialogPopup.gd

extends CanvasLayer

# Node refs
@onready var animation_player = $"../../AnimationPlayer"

#gets the values of our npc from our NPC scene and sets it in the label values
var npc_name : set = npc_name_set
var message: set = message_set
var response: set = response_set

#reference to NPC
var npc

#sets the npc name with the value received from NPC
func npc_name_set(new_value):
    npc_name = new_value
    $Dialog/NPC.text = new_value

#sets the message with the value received from NPC
func message_set(new_value):
    message = new_value
    $Dialog/Message.text = new_value

#sets the response with the value received from NPC
func response_set(new_value):
    response = new_value
    $Dialog/Response.text = new_value

#opens the dialog
func open():
    get_tree().paused = true
    self.visible = true
    animation_player.play("typewriter")

#closes the dialog
func close():
    get_tree().paused = false
    self.visible = false
如果此节点被隐藏,并且消息文本尚未完成,则此节点不应接收输入。因此,在 _ ready () 函数中,我们必须调用set_process_input()函数来禁用输入处理。这将禁用 Player 脚本中的输入函数和输入单例来处理任何输入。
### DialogPopup.gd

# older code

# ------------------- Processing ---------------------------------
#no input on hidden
func _ready():
    set_process_input(false)

#opens the dialog
func open():
    get_tree().paused = true
    self.visible = true
    animation_player.play("typewriter")

#closes the dialog
func close():
    get_tree().paused = false
    self.visible = false
我们只希望玩家能够在“打字机”动画完成消息文本动画后插入输入。因此,我们可以将 AnimationPlayer 节点的 animation_finished() 信号连接到我们的 DialogPopup 脚本。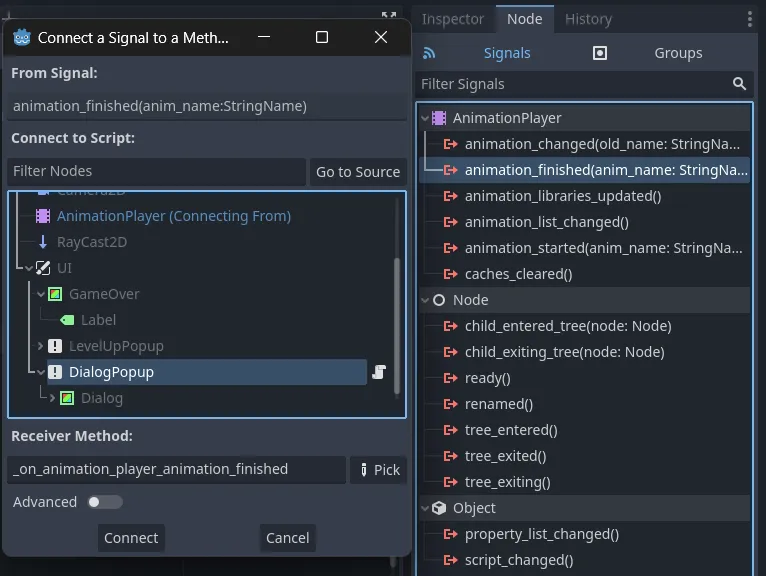
### DialogPopup.gd

# older code

# ------------------- Processing ---------------------------------
#no input on hidden
func _ready():
    set_process_input(false)

#opens the dialog
func open():
    get_tree().paused = true
    self.visible = true
    animation_player.play("typewriter")

#closes the dialog
func close():
    get_tree().paused = false
    self.visible = false

#input after animation plays
func _on_animation_player_animation_finished(anim_name):
    set_process_input(true)
最后,我们可以编写代码来接受玩家的输入以响应我们的对话框选项。我们不必为此创建独特的输入操作,因为我们只需使用InputEventKey对象即可。此对象存储键盘上的按键。因此,如果我们按下“A”或“B”,该对象将捕获这些键作为输入并触发对话框树以响应这些输入。
下面是一个直观的表示,可以帮助您了解我们想要实现的目标: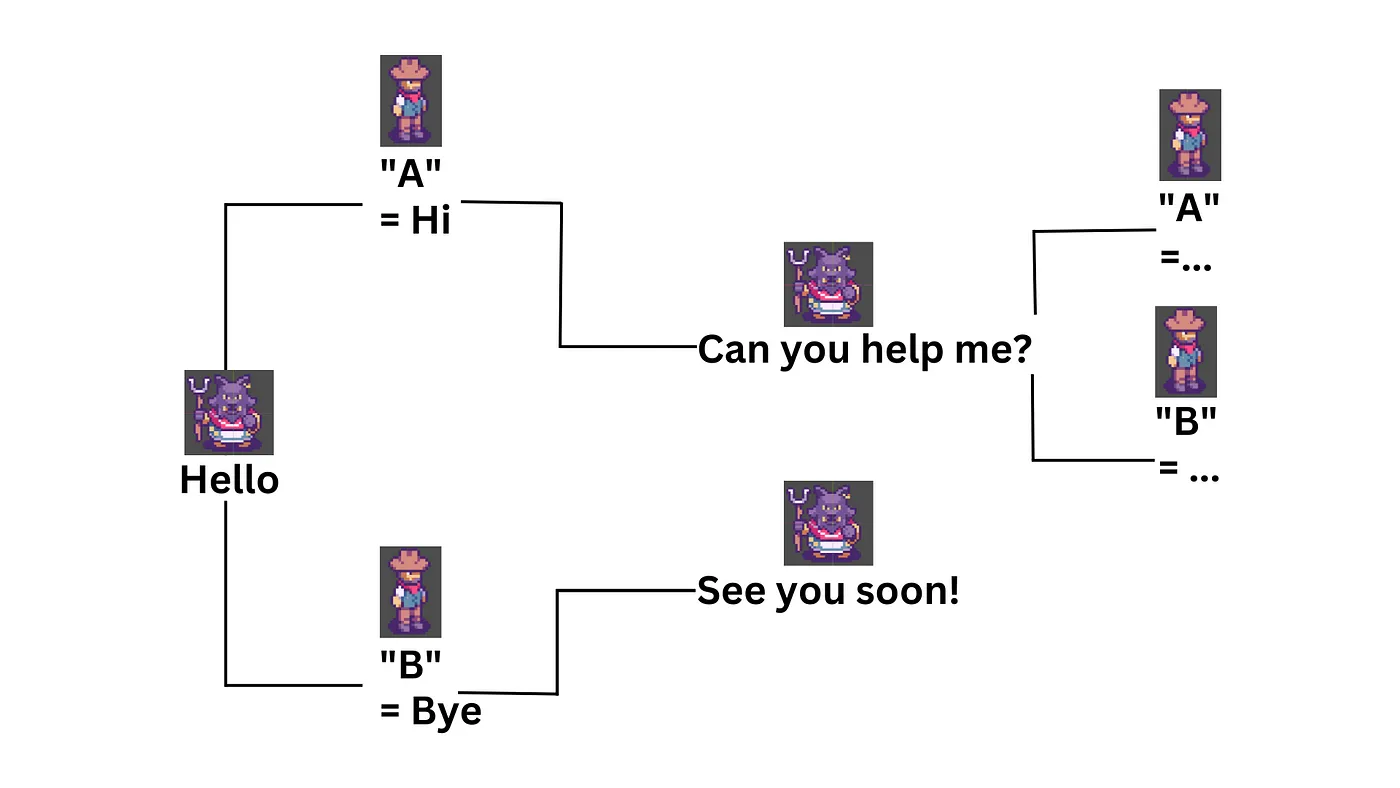
### DialogPopup.gd

#older code

# ------------------- Dialog -------------------------------------
func _input(event):
    if event is InputEventKey:
        if event.is_pressed():
            if event.keycode == KEY_A:
                #todo: add dialog function to npc
                return
            elif event.keycode == KEY_B:
                #todo: add dialog function to npc
                return
NPC 对话树
什么是对话树?
对话树,通常称为对话树或分支对话,是一种交互式叙述形式。它表示角色对话或互动中的一系列分支选择,允许玩家或用户根据他们的选择浏览各种对话路径。
一旦我们的 NPC 脚本中有了对话函数,我们就会回到这个 _input 函数。我们现在要开始处理这个问题,所以让我们打开我们的 NPC 脚本并定义一些变量来存储我们的任务和对话状态。我们将创建一个枚举来保存我们的任务的状态——即未启动、已启动和已完成的状态。然后我们将实例化该枚举以将其初始状态设置为NOT_STARTED。然后我们需要将对话的状态存储为整数。
我们将对话状态定义为一个整数,这样我们就可以在整个对话树中增加它,然后我们可以根据 match 语句中的数值选择对话。match 语句用于分支程序的执行。它相当于许多其他语言中的 switch 语句,它的工作方式是将表达式与模式进行比较,如果该模式匹配,则将执行相应的块。之后,执行继续到 match 语句下面。
我们的对话和任务状态将按照以下匹配模式执行:
match (quest_status):
 NOT_STARTED:
  match (dialog_state):
   0:
    //dialog message
    //increase dialog state
    match (answer):
     //dialog message
     //increase dialog state
   1:
    //dialog message
    //increase dialog state
    match (answer):
     //dialog message
     //increase dialog state
    STARTED:
  match (dialog_state):
   0:
    //dialog message
    //increase dialog state
    match (answer):
     //dialog message
     //increase dialog state
   1:
    //dialog message
    //increase dialog state
    match (answer):
     //dialog message
     //increase dialog state
    COMPLETED:
  match (dialog_state):
   0:
    //dialog message
    //increase dialog state
    match (answer):
     //dialog message
让我们定义变量。
### NPC

extends CharacterBody2D

#quest and dialog states
enum QuestStatus { NOT_STARTED, STARTED, COMPLETED }
var quest_status = QuestStatus.NOT_STARTED
var dialog_state = 0
var quest_complete = false
我们还需要定义一些变量,这些变量将引用我们玩家场景中的 DialogPopup 节点以及我们玩家本身——因为我们的玩家将发起与我们的 NPC 的互动。
### NPC

extends CharacterBody2D

# Node refs
@onready var dialog_popup = get_tree().root.get_node("Main/Player/UI/DialogPopup")
@onready var player = get_tree().root.get_node("Main/Player")
@onready var animation_sprite = $AnimatedSprite2D

#quest and dialog states
enum QuestStatus { NOT_STARTED, STARTED, COMPLETED }
var quest_status = QuestStatus.NOT_STARTED
var dialog_state = 0
var quest_complete = false
我还希望我们在 Inspector 面板中输入 NPC 的名称,而不是给他们一个像“Joe”这样的常量值。为此,我们可以导出变量。
### NPC

extends CharacterBody2D

# Node refs
@onready var dialog_popup = get_tree().root.get_node("Main/Player/UI/DialogPopup")
@onready var player = get_tree().root.get_node("Main/Player")
@onready var animation_sprite = $AnimatedSprite2D

#quest and dialog states
enum QuestStatus { NOT_STARTED, STARTED, COMPLETED }
var quest_status = QuestStatus.NOT_STARTED
var dialog_state = 0
var quest_complete = false

#npc name
@export var npc_name = ""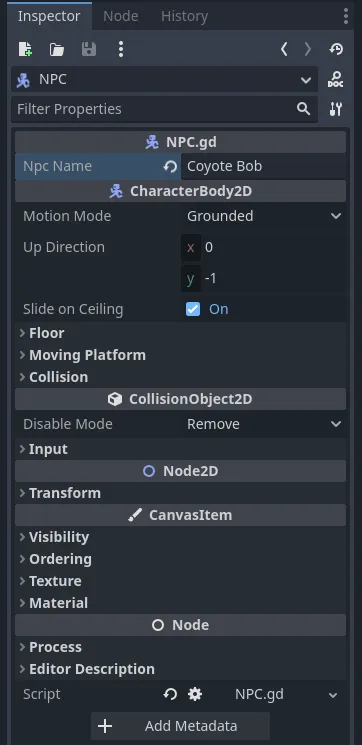
在我们的ready () 函数中,我们需要将 NPC 的默认动画设置为“idle_down”。
### NPC
extends CharacterBody2D

# Node refs
@onready var dialog_popup = get_tree().root.get_node("Main/Player/UI/DialogPopup")
@onready var player = get_tree().root.get_node("Main/Player")
@onready var animation_sprite = $AnimatedSprite2D

#quest and dialog states
enum QuestStatus { NOT_STARTED, STARTED, COMPLETED }
var quest_status = QuestStatus.NOT_STARTED
var dialog_state = 0
var quest_complete = false

#npc name
@export var npc_name = ""

#initialize variables
func _ready():
    animation_sprite.play("idle_down")
现在我们可以创建dialog()函数了。这个对话树很长,所以我建议你直接复制粘贴即可。对话树或对话树是一种游戏机制,当玩家角色与 NPC 互动时运行。在这棵树中,玩家可以选择要说什么,并做出后续选择,直到对话结束。
在我们的对话树中,我们的 NPC 引导玩家完成一个任务,去寻找一本食谱书。我们还没有创建这本食谱书或任务物品,它将调用我们的 NPC 通知他们任务已完成。如果我们还没有得到这个任务物品,NPC 会提醒我们去拿。如果我们得到了这个任务物品,NPC 会感谢我们并奖励我们,并完成任务。
### NPC
extends CharacterBody2D

# Node refs
@onready var dialog_popup = get_tree().root.get_node("Main/Player/UI/DialogPopup")
@onready var player = get_tree().root.get_node("Main/Player")
@onready var animation_sprite = $AnimatedSprite2D

#quest and dialog states
enum QuestStatus { NOT_STARTED, STARTED, COMPLETED }
var quest_status = QuestStatus.NOT_STARTED
var dialog_state = 0
var quest_complete = false

#npc name
@export var npc_name = ""

#initialize variables
func _ready():
    animation_sprite.play("idle_down")

#dialog tree
func dialog(response = ""):
    # Set our NPC's animation to "talk"
    animation_sprite.play("talk_down")
    # Set dialog_popup npc to be referencing this npc
    dialog_popup.npc = self
    dialog_popup.npc_name = str(npc_name)
    # dialog tree
    match quest_status:
        QuestStatus.NOT_STARTED:
            match dialog_state:
                0:
                    # Update dialog tree state
                    dialog_state = 1
                    # Show dialog popup
                    dialog_popup.message = "Howdy Partner. I haven't seen anybody round these parts in quite a while. That reminds me, I recently lost my momma's secret recipe book, can you help me find it?"
                    dialog_popup.response = "[A] Yes  [B] No"
                    dialog_popup.open() #re-open to show next dialog
                1:
                    match response:
                        "A":
                            # Update dialog tree state
                            dialog_state = 2
                            # Show dialog popup
                            dialog_popup.message = "That's mighty kind of you, thanks."
                            dialog_popup.response = "[A] Bye"
                            dialog_popup.open() #re-open to show next dialog
                        "B":
                            # Update dialog tree state
                            dialog_state = 3
                            # Show dialog popup
                            dialog_popup.message = "Well, I'll be waiting like a tumbleweed 'till you come back."
                            dialog_popup.response = "[A] Bye"
                            dialog_popup.open() #re-open to show next dialog
                2:
                    # Update dialog tree state
                    dialog_state = 0
                    quest_status = QuestStatus.STARTED
                    # Close dialog popup
                    dialog_popup.close()
                    # Set NPC's animation back to "idle"
                    animation_sprite.play("idle_down")
                3:
                    # Update dialog tree state
                    dialog_state = 0
                    # Close dialog popup
                    dialog_popup.close()
                    # Set NPC's animation back to "idle"
                    animation_sprite.play("idle_down")
        QuestStatus.STARTED:
            match dialog_state:
                0:
                    # Update dialog tree state
                    dialog_state = 1
                    # Show dialog popup
                    dialog_popup.message = "Found that book yet?"
                    if quest_complete:
                        dialog_popup.response = "[A] Yes  [B] No"
                    else:
                        dialog_popup.response = "[A] No"
                    dialog_popup.open()
                1:
                    if quest_complete and response == "A":
                        # Update dialog tree state
                        dialog_state = 2
                        # Show dialog popup
                        dialog_popup.message = "Yeehaw! Now I can make cat-eye soup. Here, take this."
                        dialog_popup.response = "[A] Bye"
                        dialog_popup.open()
                    else:
                        # Update dialog tree state
                        dialog_state = 3
                        # Show dialog popup
                        dialog_popup.message = "I'm so hungry, please hurry..."
                        dialog_popup.response = "[A] Bye"
                        dialog_popup.open()
                2:
                    # Update dialog tree state
                    dialog_state = 0
                    quest_status = QuestStatus.COMPLETED
                    # Close dialog popup
                    dialog_popup.close()
                    # Set NPC's animation back to "idle"
                    animation_sprite.play("idle_down")
                    # Add pickups and XP to the player.
                    player.add_pickup(Global.Pickups.AMMO)
                    player.update_xp(50)
                3:
                    # Update dialog tree state
                    dialog_state = 0
                    # Close dialog popup
                    dialog_popup.close()
                    # Set NPC's animation back to "idle"
                    animation_sprite.play("idle_down")
        QuestStatus.COMPLETED:
            match dialog_state:
                0:
                    # Update dialog tree state
                    dialog_state = 1
                    # Show dialog popup
                    dialog_popup.message = "Nice seeing you again partner!"
                    dialog_popup.response = "[A] Bye"
                    dialog_popup.open()
                1:
                    # Update dialog tree state
                    dialog_state = 0
                    # Close dialog popup
                    dialog_popup.close()
                    # Set NPC's animation back to "idle"
                    animation_sprite.play("idle_down")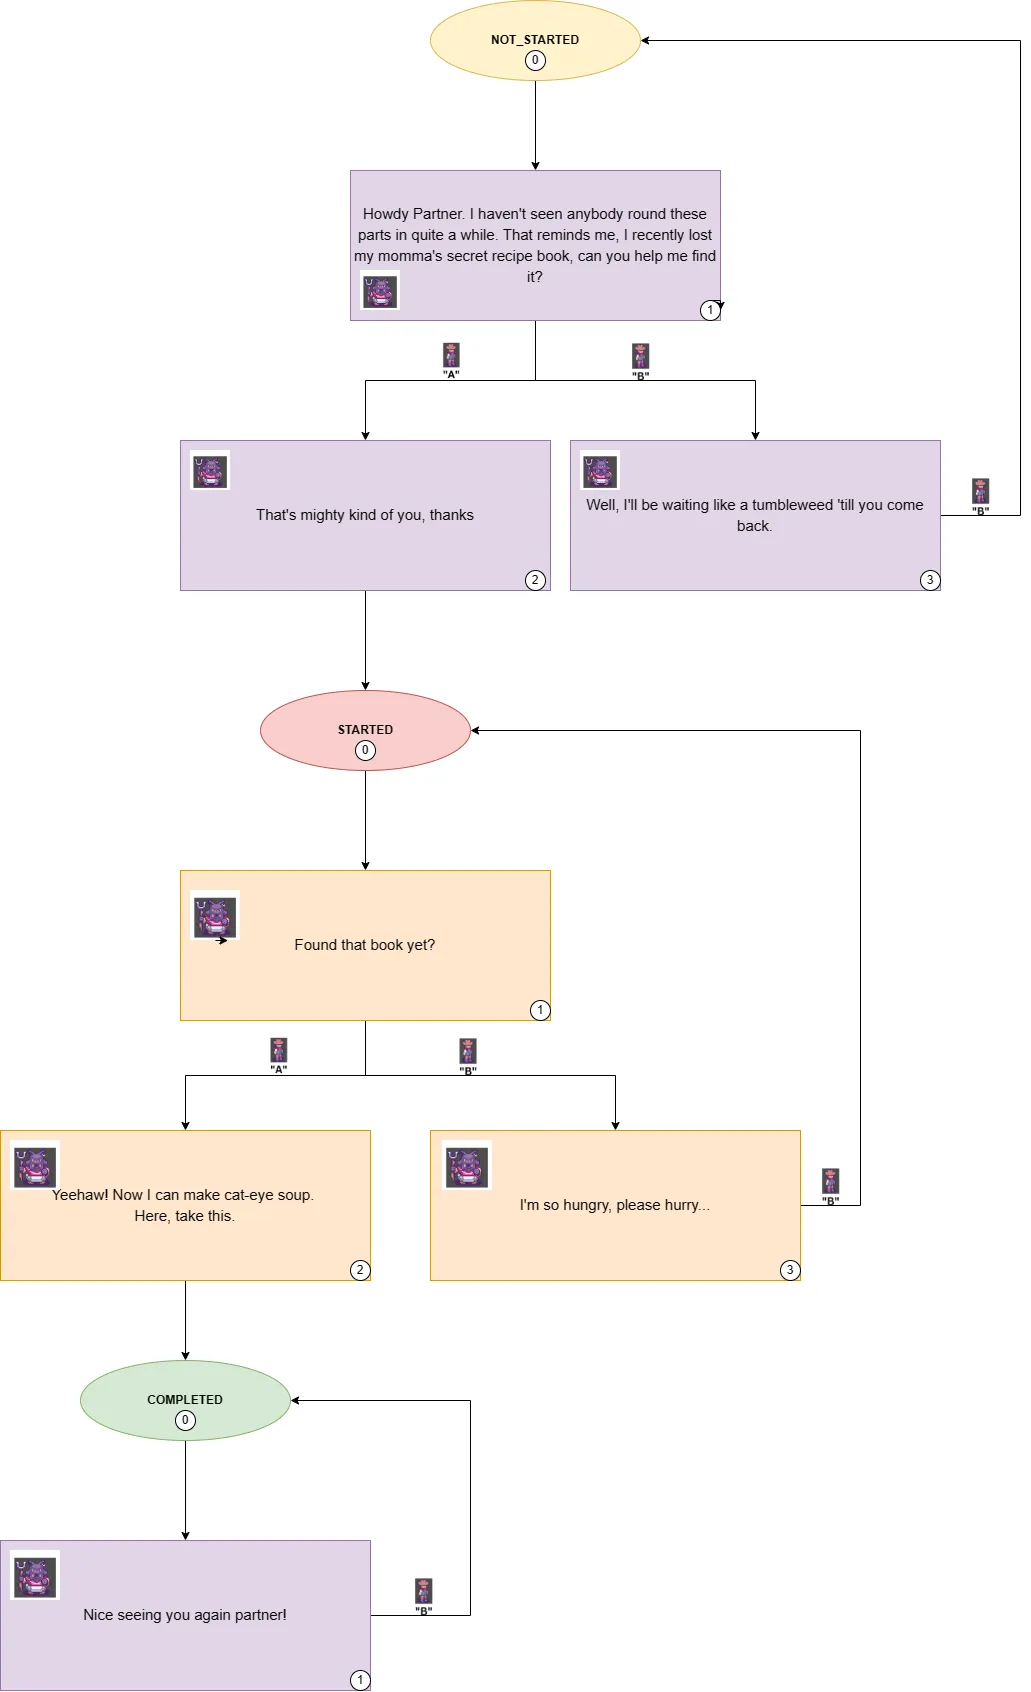
图 1:对话树的视觉表示。
任务物品设置
对于这个任务物品,我们可以复制我们的 Pickups 场景并将其重命名为“QuestItem”。从新创建的场景中分离 Pickups 脚本和信号,并将其根重命名为“QuestItem”。从根节点中删除脚本和信号。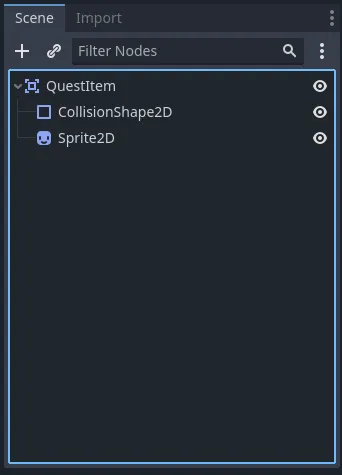
将其精灵更改为您想要的任何内容。由于我们的 NPC 正在寻找食谱书,我将把我的精灵更改为“book_02d.png”,可以在 Assets > Icons 目录下找到。
将新脚本附加到此场景的根目录,并将其保存在 Scripts 文件夹下。同时,将其body_entered()信号连接到此新脚本。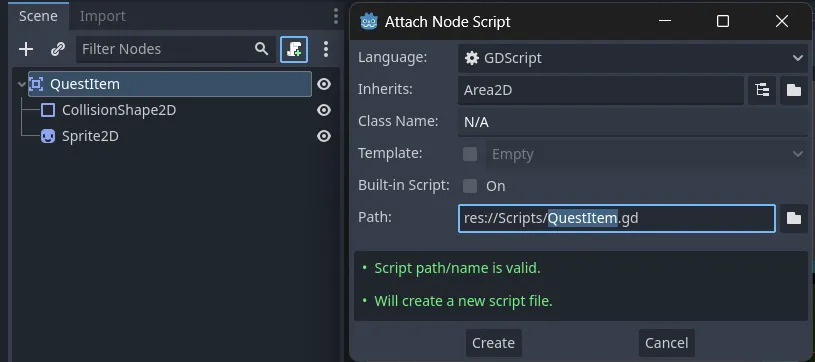
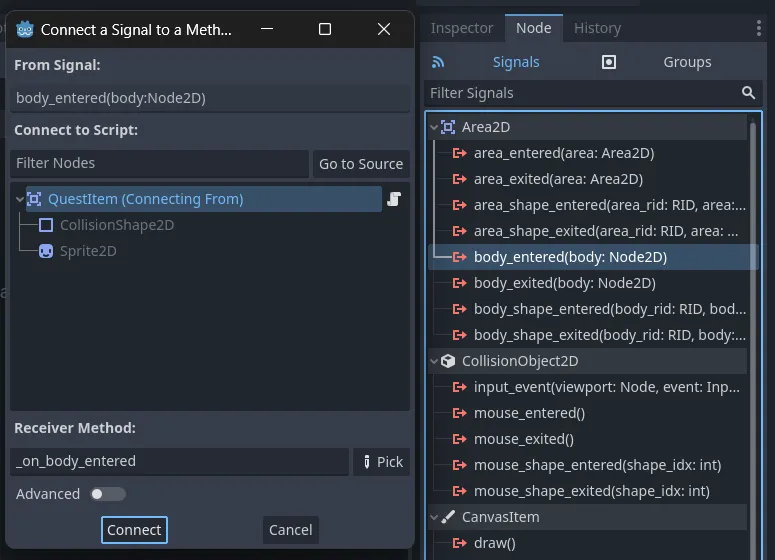
在这个脚本中,我们需要获取对 NPC 场景的引用,我们将在主场景中实例化该场景。由此,我们需要查看玩家是否已进入该场景的主体,如果是,我们可以调用我们的 NPC 将其任务状态更改为完成 — 因为我们已经找到了完成任务的要求。
### QuestItem.gd

extends Area2D

#npc node reference
@onready var npc = get_tree().root.get_node("Main/SpawnedNPC/NPC")

#if the player enters the collision body, destroy item and update quest
func _on_body_entered(body):
    if body.name == "Player":
        print("Quest item obtained!")
        get_tree().queue_delete(self)
        npc.quest_complete = true
让我们在主场景中将我们的 NPC 和任务项目实例化为两个新节点,分别称为 SpawnedQuestItems 和 SpawnedNPC(两者都应该是 Node2D 节点)。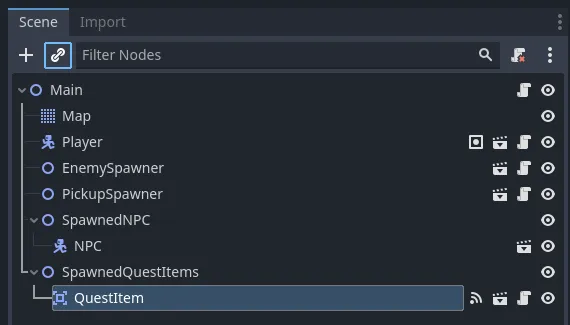
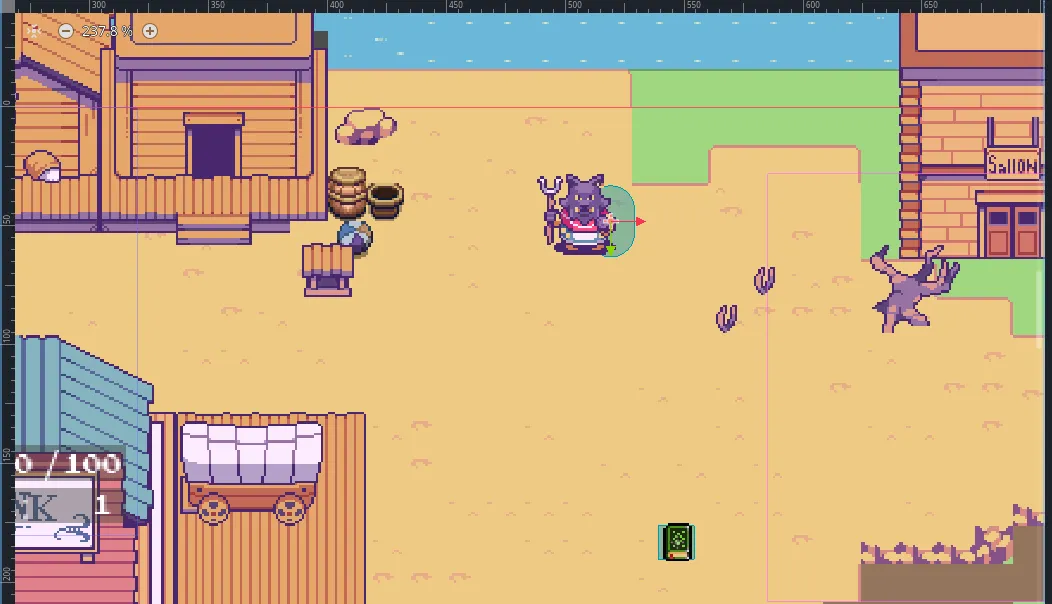
以下是我任务的地图布局示例: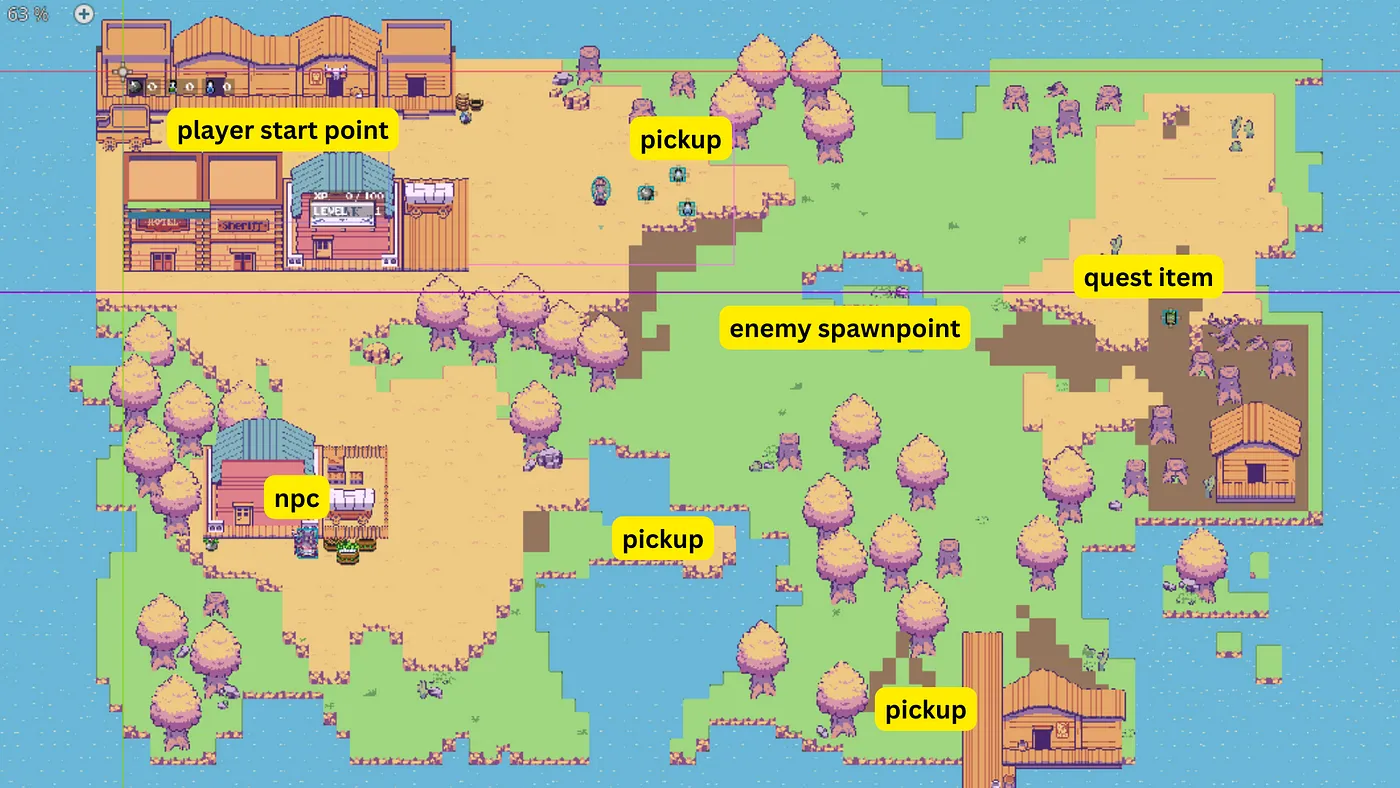
现在我们需要回到我们的玩家场景,以便我们可以更新我们的交互输入来调用我们的 NPC 脚本中的对话函数。
### QuestItem.gd

extends Area2D

#npc node reference
@onready var npc = get_tree().root.get_node("Main/SpawnedNPC/NPC")

#if the player enters the collision body, destroy item and update quest
func _on_body_entered(body):
    if body.name == "Player":
        print("Quest item obtained!")
        get_tree().queue_delete(self)
        npc.quest_complete = true
我们还需要将对话函数添加到 DialogPopup 的输入代码中,以捕获我们的 A 和 B 响应。
### DialogPopup.gd

#older code

# ------------------- Dialog -------------------------------------
func _input(event):
    if event is InputEventKey:
        if event.is_pressed():
            if event.keycode == KEY_A:
                npc.dialog("A")
            elif event.keycode == KEY_B:
                npc.dialog("B")
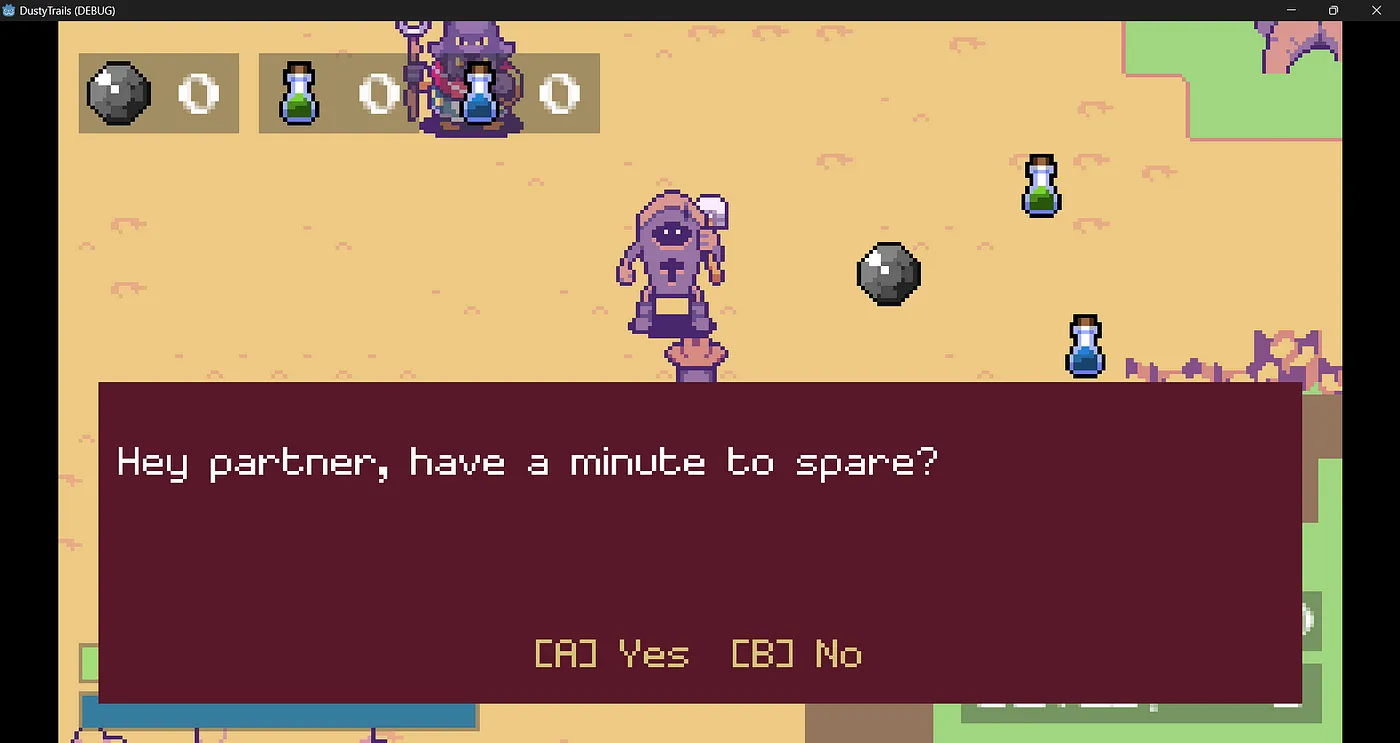
所以现在如果我们的玩家遇到我们的 NPC 并按下 TAB,对话框弹出窗口应该可见。然后我们可以通过用“A”表示是和“B”表示否来浏览与我们的 NPC 的对话。如果我们获得任务物品并返回 NPC,对话选项应该会更新,我们应该收到我们的 Pickups 作为奖励。然后我们就到达了对话树的末尾,所以如果我们返回我们的 NPC,最后一句就会播放。
在测试之前,我们需要更改节点的处理模式,因为 DialogPopup 会暂停游戏。将 NPC 的处理模式更改为“始终”,因为我们需要即使游戏暂停(即对话框播放时)也能播放他们的动画。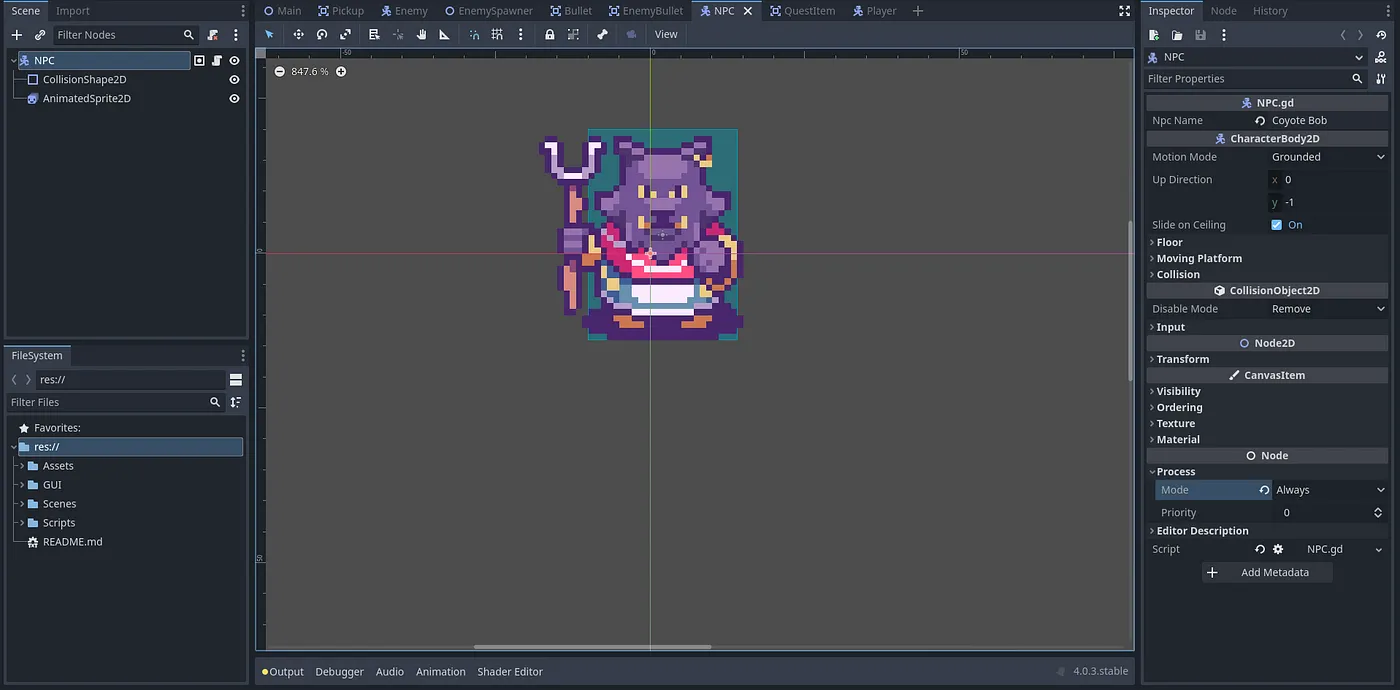
将 DialogPopup 的处理模式更改为“暂停时”,因为我们需要能够在游戏暂停时运行我们的输入。
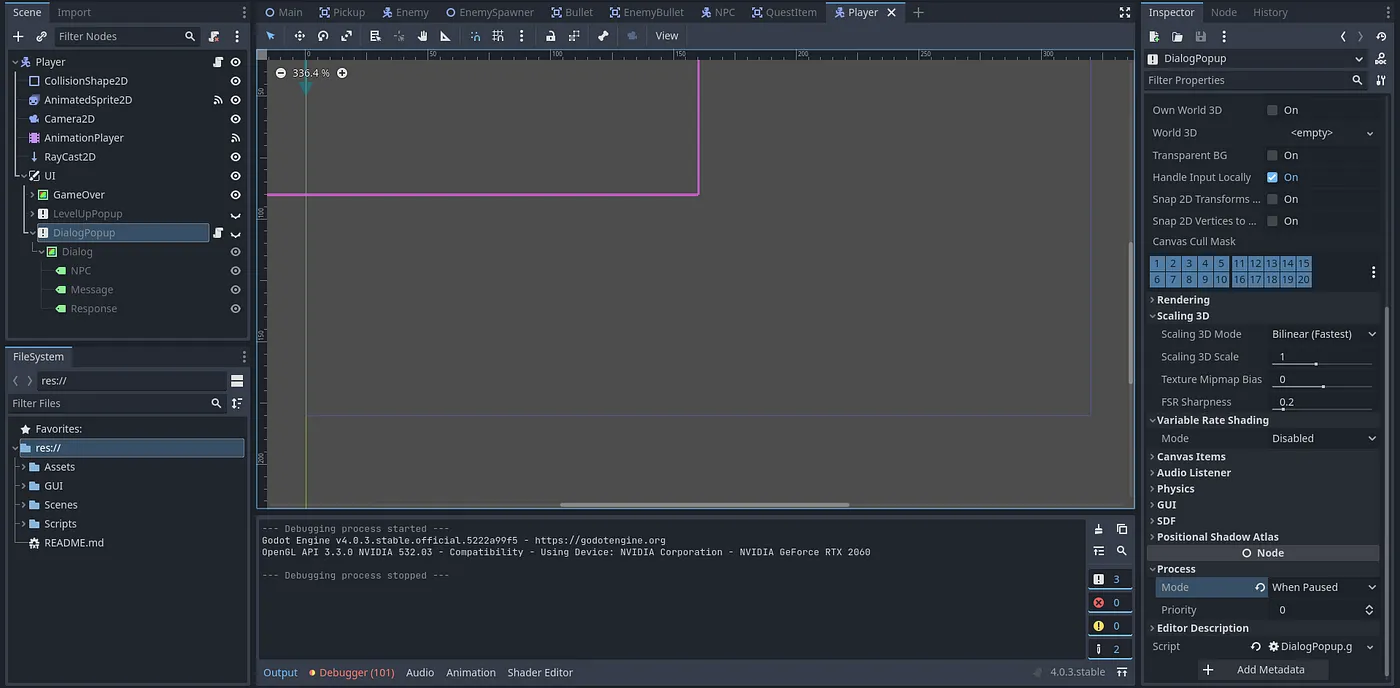
最后,我们需要将玩家的处理模式改为“始终”。这意味着即使游戏暂停,我们的玩家也能够向游戏添加输入。
如果我们现在玩游戏,就会出现一个问题,因为当对话框运行时,我们的玩家将能够离开 NPC,因此要解决这个问题,我们需要禁用在 physics_process() 函数中执行的玩家移动。为此,我们可以在 open() 函数的末尾调用它并将其处理设置为 false!然后在我们的 close 函数中,我们只需要将其设置回 true,因为如果对话框弹出窗口被隐藏,我们希望我们的玩家再次移动。我们还将显示/隐藏光标。
### DialogPopup.gd

extends CanvasLayer

# Node refs
@onready var animation_player = $"../../AnimationPlayer"
@onready var player = $"../.."

#gets the values of our npc from our NPC scene and sets it in the label values
var npc_name : set = npc_name_set
var message: set = message_set
var response: set = response_set

#reference to NPC
var npc

# ---------------------------- Text values ---------------------------
#sets the npc name with the value received from NPC
func npc_name_set(new_value):
    npc_name = new_value
    $Dialog/NPC.text = new_value

#sets the message with the value received from NPC
func message_set(new_value):
    message = new_value
    $Dialog/Message.text = new_value

#sets the response with the value received from NPC
func response_set(new_value):
    response = new_value
    $Dialog/Response.text = new_value

# ------------------- Processing ---------------------------------
#no input on hidden
func _ready():
    set_process_input(false)

#opens the dialog
func open():
    get_tree().paused = true
    self.visible = true
    animation_player.play("typewriter")
    player.set_physics_process(false)
    Input.set_mouse_mode(Input.MOUSE_MODE_VISIBLE)

#closes the dialog
func close():
    get_tree().paused = false
    self.visible = false
    player.set_physics_process(true)
    Input.set_mouse_mode(Input.MOUSE_MODE_HIDDEN)

#input after animation plays
func _on_animation_player_animation_finished(anim_name):
    set_process_input(true)

# ------------------- Dialog -------------------------------------
func _input(event):
    if event is InputEventKey:
        if event.is_pressed():
            if event.keycode == KEY_A:
                npc.dialog("A")
            elif event.keycode == KEY_B:
                npc.dialog("B")
如果您运行游戏,然后跑到 NPC 面前并按下“TAB”,您的 NPC 对话树应该会运行,并且您应该能够接受任务。如果您随后跑过任务物品并返回到您的 NPC 身边,您的 NPC 会注意到您已获得任务物品并完成了任务。恭喜,您现在有了一个拥有简单任务的 NPC!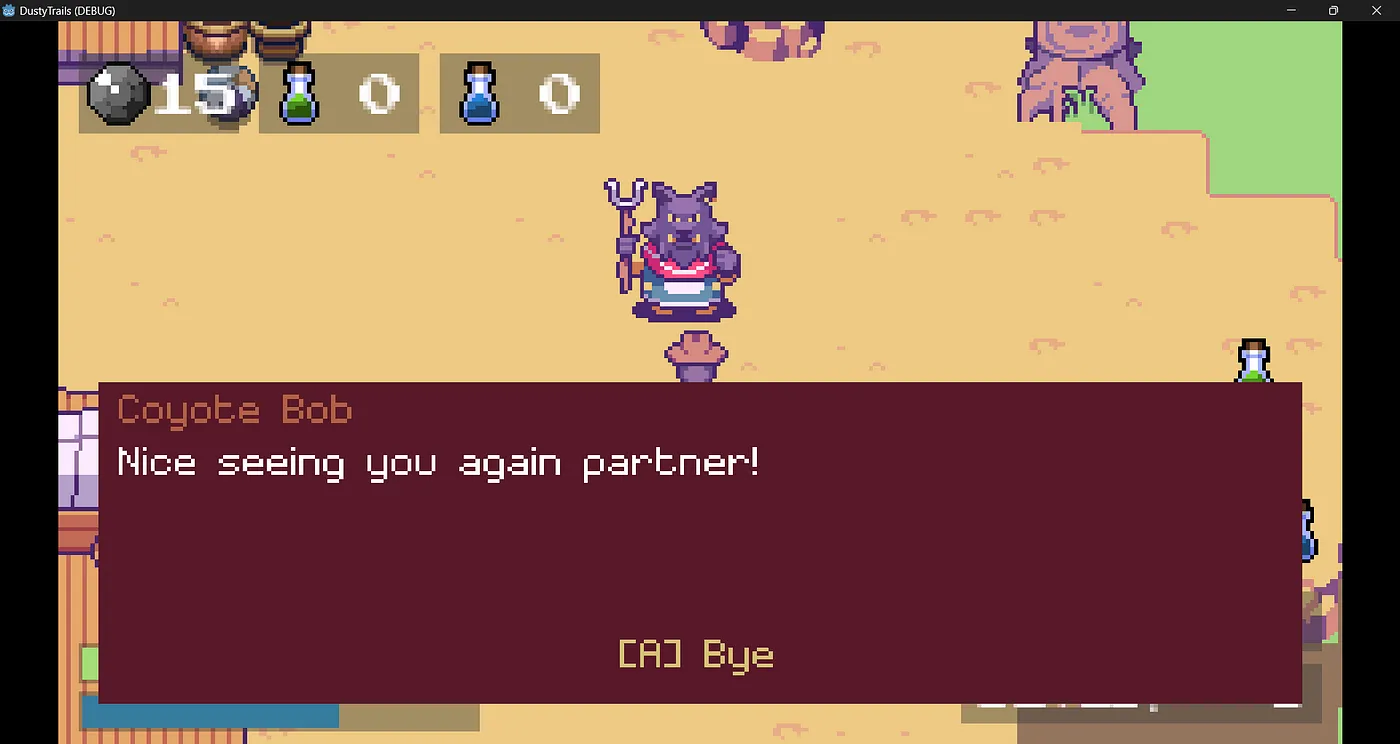
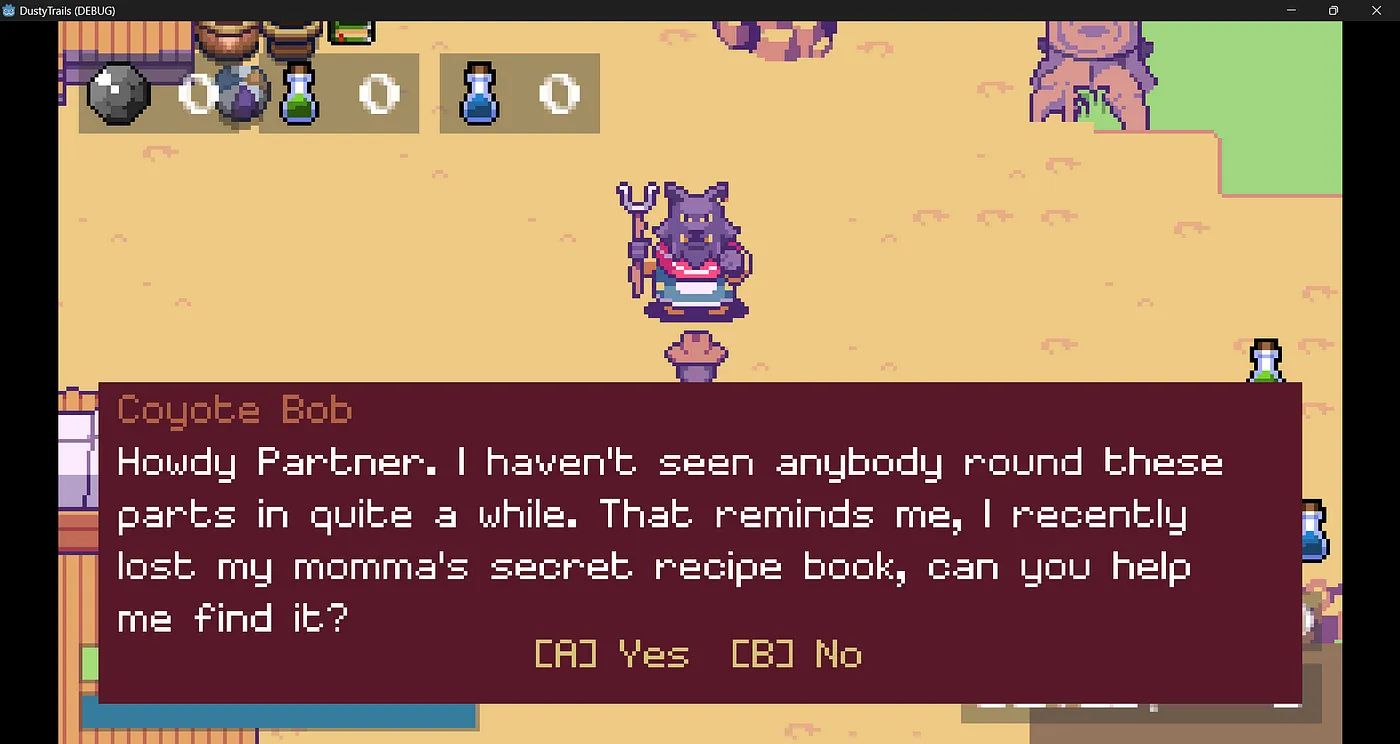
不幸的是,我们的任务和对话直接与 NPC 相关 — 在真正的游戏中,NPC、任务和对话系统都包含在脚本中。我打算为此制作一个单独的教程系列,但现在,我只想向您展示对话树和状态的基础知识。
如果您想要多个 NPC,则必须复制 NPC 场景和脚本以及任务物品场景和脚本 — 然后只需更新值即可获得唯一的对话和对第二个 NPC 的引用。我将在上面的代码参考中包含另一个 NPC 的示例。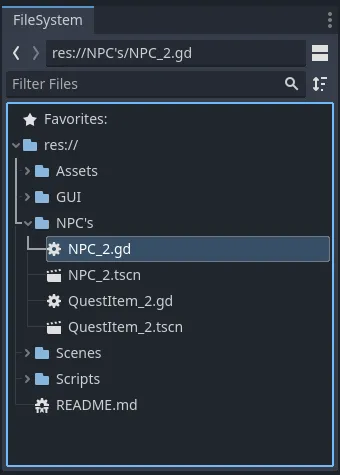
就这样!现在你的游戏有了 NPC 和任务。接下来我们将添加的其他功能将很快实现。大部分艰苦的工作已经完成,所以现在我们只需要添加一个场景转换功能来将玩家传送到各个世界,我们还将在下一部分中赋予玩家睡眠能力以恢复健康和体力值!记得保存你的项目,下一部分见。
